Contributing
You can contribute to the Research Support Handbook by making small edits, writing entirely new topics, or writing guides. All contributions are welcome and appreciated, small and large. There are two ways to contribute: via GitHub or by using the contribution portal. If you are in need of specific information, you can skip ahead using the table of contents.
Contributing portal
We offer a portal to reduce the barriers to contribute to the Research Support Handbook. You only need an internet connection and articulate what you want us to include. No accounts necessary 😊
Open the contribution portal by clicking here or copy-pasting: https://ez-github-contributor.netlify.app/
You can report issues you find with the Research Support Handbook using the “Report a problem” tab. This is a way for you to share your feedback with us.
You can propose new topics or guides to the Research Support Handbook using the “Propose new page” tab. This will be considered for inclusion. Please mention whether it should be a topic or a guide. The text editor allows you to use rich text formatting.
The portal does not save your work. Use the portal when you are ready to submit your work, but do not use it to manage your submissions.
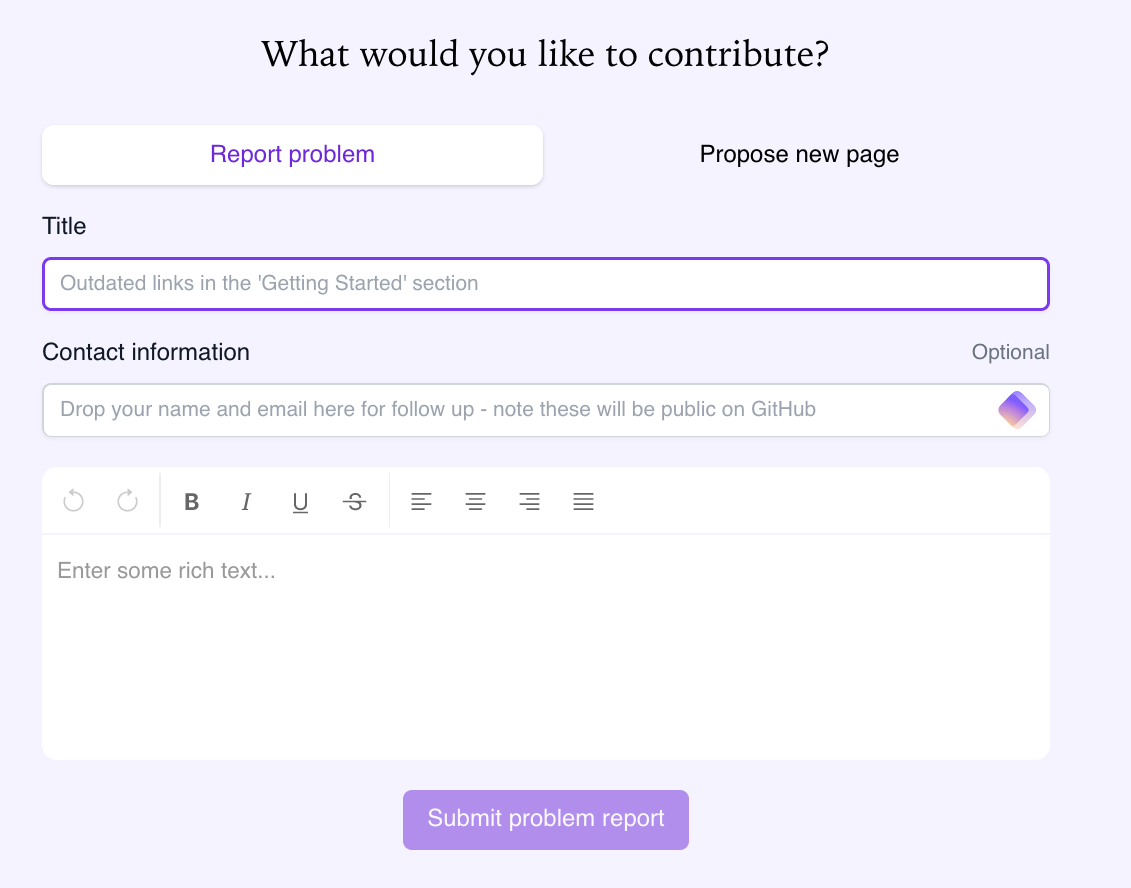
If you want to be credited with contributing, please share your name. If you’d like to hear back about what was done with your feedback or proposal, please also provide a direct way to contact you. Once you have submitted the contribution, the editors will decide how to add your contribution to the handbook. Take a look at the Editor’s guide to learn more about what criteria they consider.
Contributing via GitHub
For the next steps you need a GitHub account to contribute. You can create one directly on GitHub.
Suggesting edits
The easiest and quickest way to contribute to the book is make suggested edits. On each page you will find a button reading “Edit this page” (usually on the right).
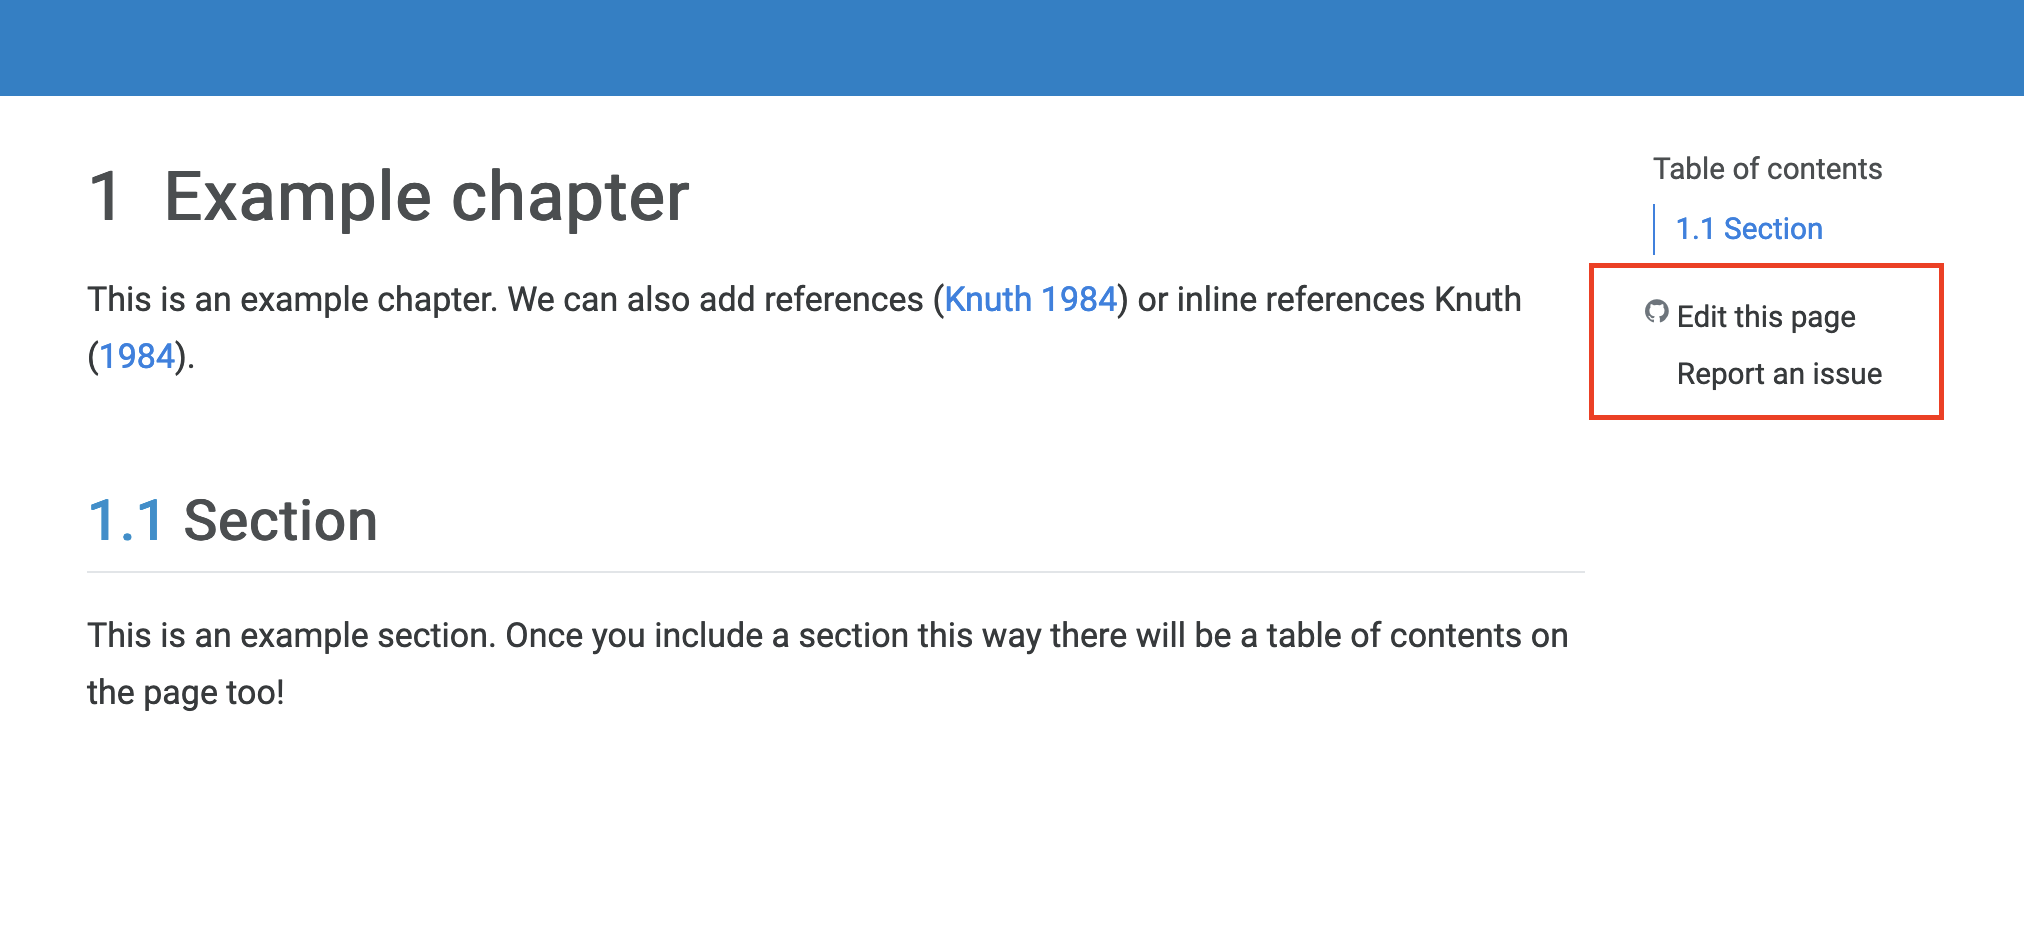
When you click that, you will immediately be taken to GitHub to edit the text of that specific page. You may be prompted to create a fork (forking) in case these are your first edits.
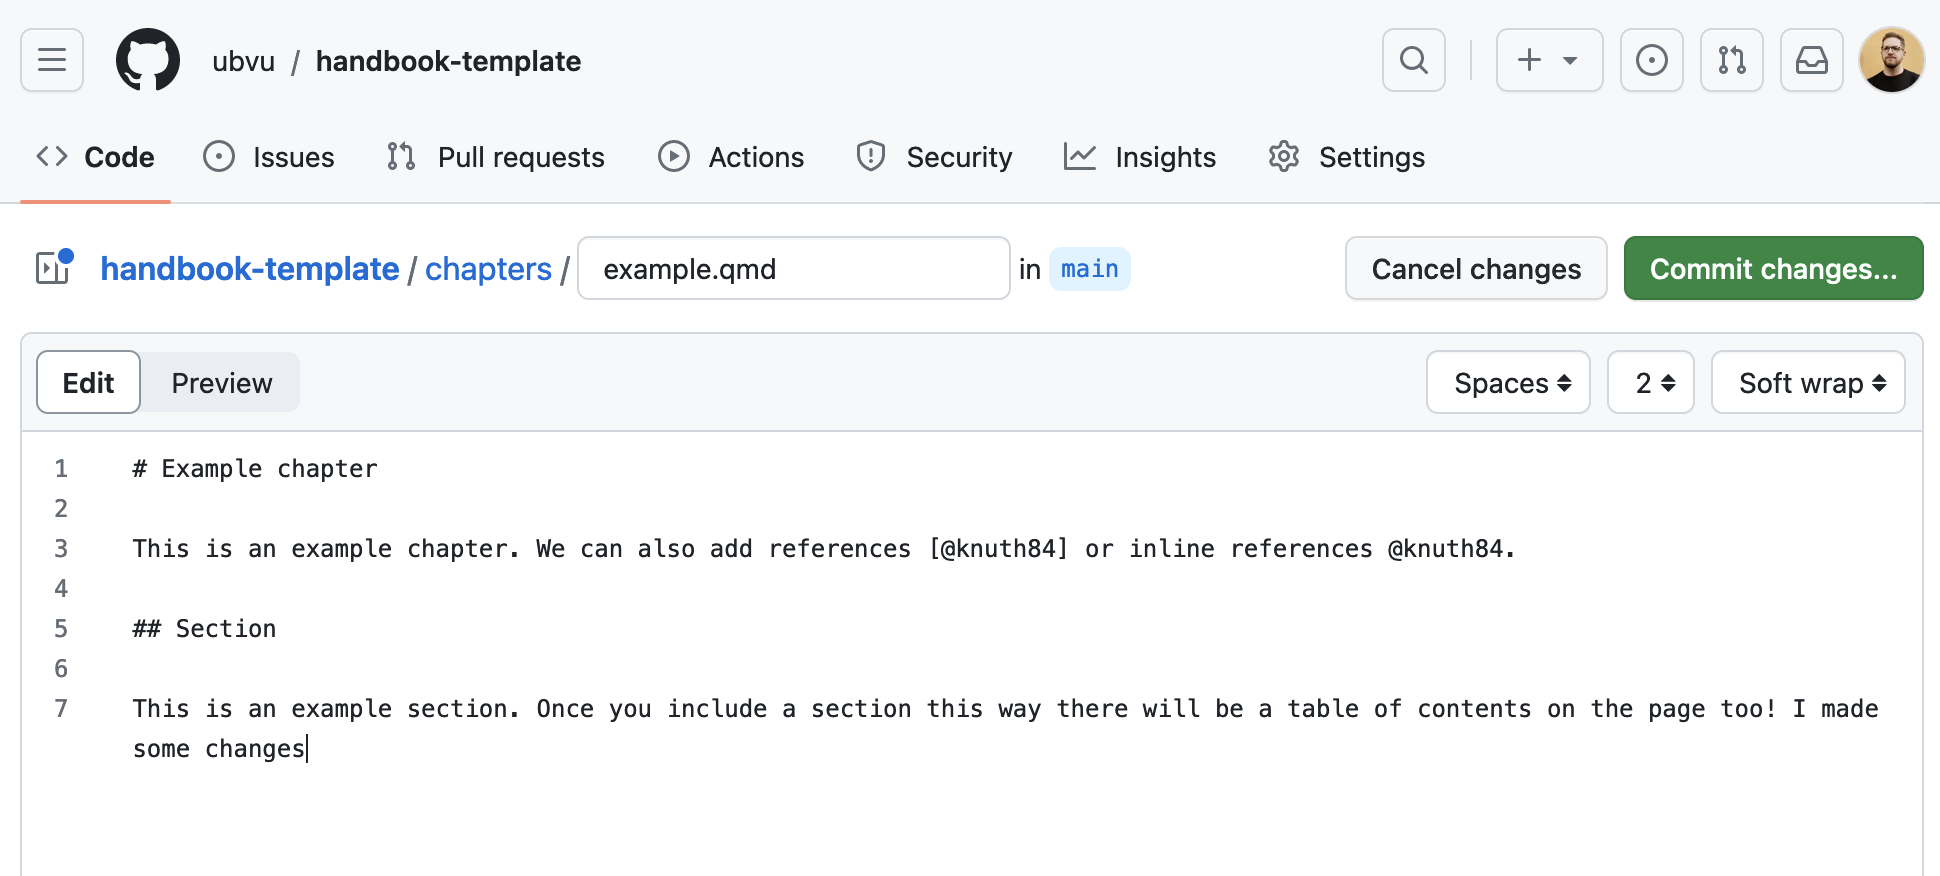
Once you made your edits, you are ready to commit (save) your changes and submit your pull request, requesting those changes to be included in the handbook.
Adding a topic
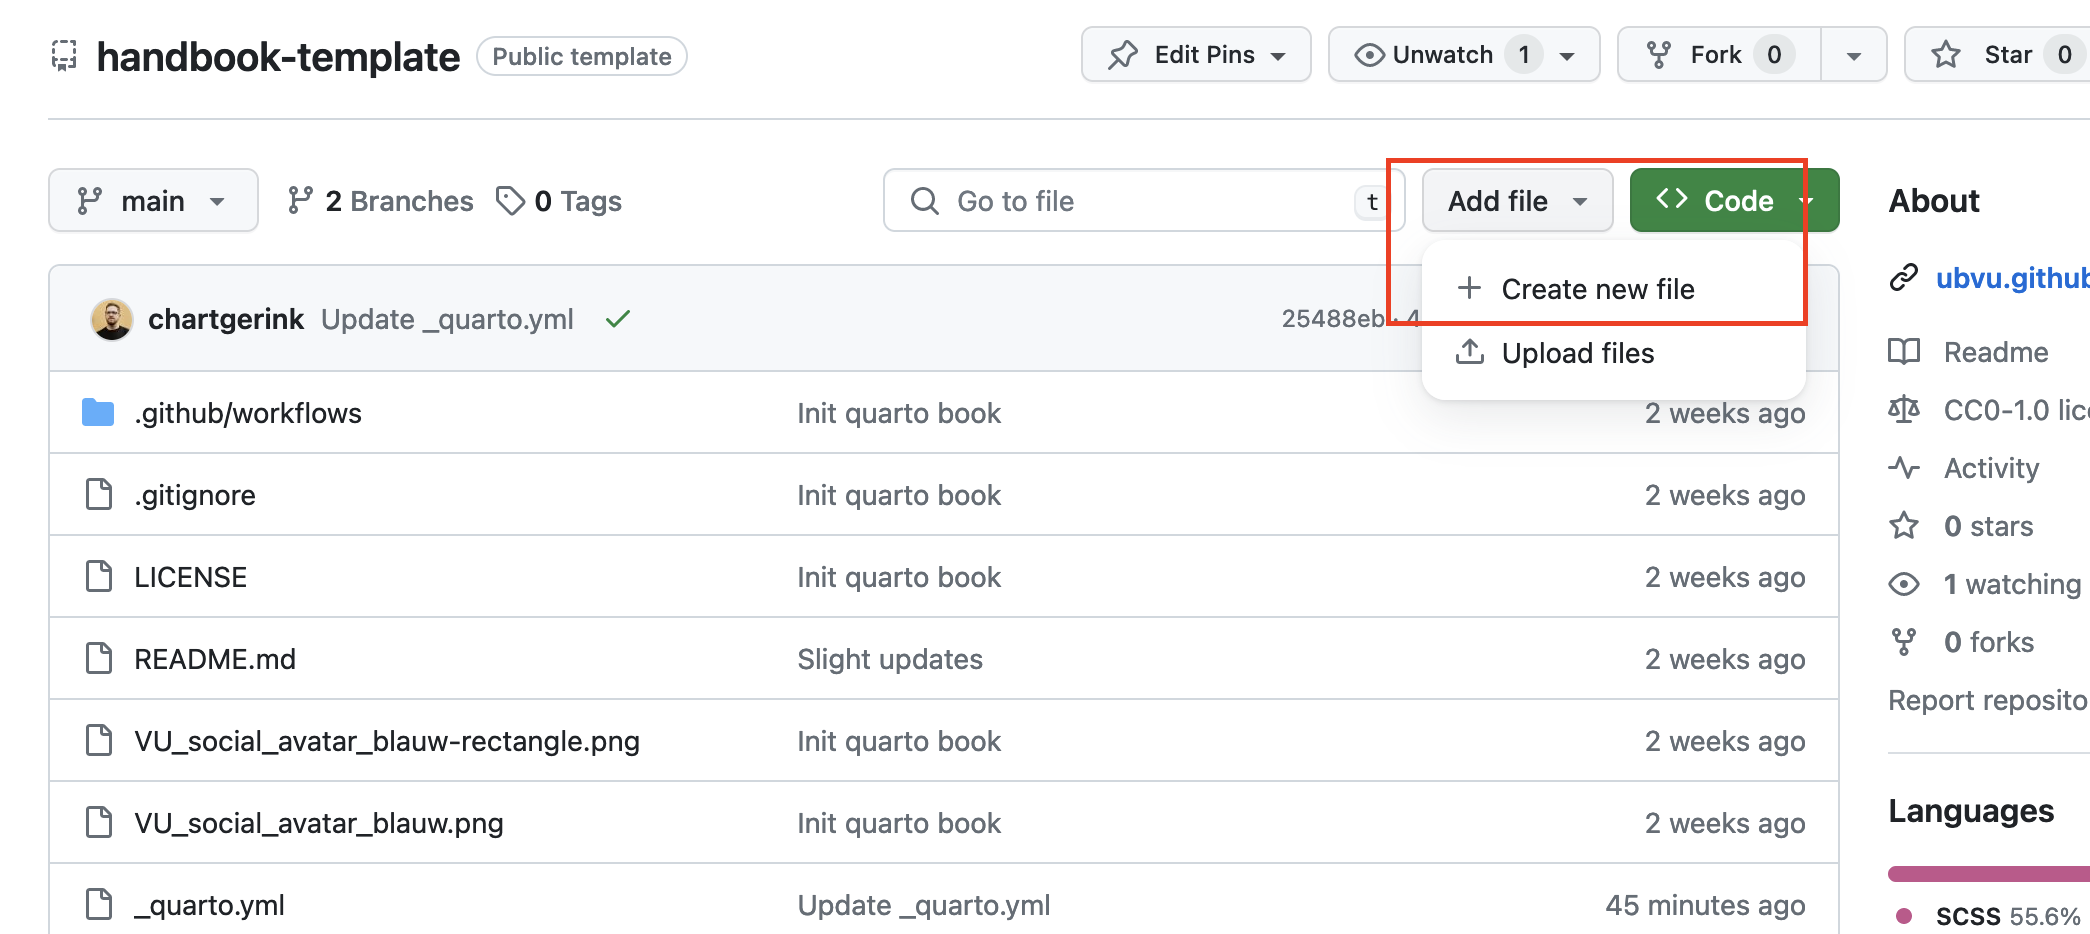
To add a new topic, you need to create a new file ending in .qmd in the topics folder (e.g., topics/example.qmd). You can do this by visiting the handbook page on GitHub and clicking Add file -> New file.
When you click this button you may be asked to fork the repository. This is not a problem so go ahead!
The topic itself needs to be written in Markdown. Every topic must be a noun/noun phrase and contain the title as such:
---
title: Example topic
---
Section headings are second level headings (e.g., ## Section). You can add all needed information as you want, but please mind that topics are supposed to short and self-contained for readers of the Research Support Handbook.
After that, you are ready to submit your pull request! The reviewers will help you place the topic in the right place of the book.
Adding a guide
To add a new guide, you need to create a new file ending in .qmd in the guides folder (e.g., guides/example.qmd). You can do this by visiting the handbook page on GitHub and clicking Add file -> New file.
When you click this button you may be asked to fork the repository. This is not a problem so go ahead!
Every guide title must reflect the question the guide answers. Add the title by adding the following information at the top of your document:
---
title: How do I create a guide?
---
Section headings are second level headings (e.g., ## Section). The guide itself needs to be written in Markdown.
You can re-use topics literally in your guides. For each topic you want to include, you can either mention so on a line surrounded by whitespaces:
INSERT TOPIC: DATA MANAGEMENT PLANThis will tell the editorial team to include that topic there. Please be specific in naming the topic. You can also directly include the topic yourself directly using the following code:
## Topic name

    ```{.include shift-heading-level-by=2}
    ../topics/replace-with-filename.qmd
    ```
You need to count the heading level in your guide to identify your shift number. In this case, there are two ## so we shift by two. You can verify the filename directly, but it should correspond to each word separated by a minus sign (for example, data-management-plan.qmd).
After that, you are ready to submit your pull request!
Adding a tool
Tool descriptions always consist of multiple pages. To add a new tool it is best to work locally, for example in VScode.
If a new tool needs to be added do the following (using SPSS as an example):
Copy template
- Copy the folder
/tools/_templateto/tools/spss. Always use lowercase for folder and file names.
Add the tool to the Tools overview page
- Copy a logo image to the
/publicfolder (use Google image search to find one). Preferred format is svg. - Edit the metadata section in
/tools/spss/index.qmd. Set the application name astitle, the path to the logo image and one or more appropriate categories:
---
title: SPSS # Add link to this page to ./tools.qmd title must be the tool name
categories: [Statistics] # categories appropriate to this tool
image: '/public/spss-logo.svg' # Make sure to add a logo
---

## What is it?

## What can it be used for?- Edit the metadata section of
/tools.qmd, add/tools/spss/index.qmdto thelistingcontentsto make the tool visible on the tools page:
---
title: Tools
listing:
  id: tools
  template: ./_templates/accordion-logo.ejs.md
  contents:
...
    - tools/snellius/index.qmd
    - tools/spss/index.qmd
    - tools/vucomputehub/index.qmd
    - tools/yoda/index.qmd
...
---

...
Edit the pages
- Make sure to edit at least the
index.qmd(What is?),cost_access.qmd,contact_support.qmdandquick_start.qmdfiles. - Delete unused files from the tool folder and the
_sidebar.yml. - You can also add extra pages as needed. Make sure to add them to the
_sidebar.ymlfile under theDocumentationsection. If you need extra subsections underDocumentationyou can add them to_sidebar.ymlas needed.
After that, you are ready to submit your pull request!
Editing multiple files
There are situations in which you need to edit multiple files. If you carry out all edits in separate pull requests, this may be a long and repetitive task. Instead, you can change multiple files at once in a single pull request.
In case you want to edit multiple files in one go, here’s a video to help you along the way!
Submit a pull request
Once you have made suggested changes, a pull request is the way for you to ask for your changes to be incorporated into the Research Support Handbook. The handbook editors will review what you wrote, ask some questions, and accept or decline your contributions.
We recommend keeping your suggested changes small or limited in scope, and explaining why you are suggesting these changes. It is more likely your changes are included when you are fixing a typo or adding a paragraph, and less likely if you are revising the entire handbook. It is also more likely they are included if you explain why you are suggesting the changes, rather than dropping by and making edits without any context.
If you are adding a new topic or guide, it is definitely recommended to open an issue first to see whether there is a need for it (and maybe you’ll find collaborators!).
During the review process you may be asked to update your changes, or revisions may be added by the people maintaining the handbook. It is helpful if you keep an eye on your GitHub account to ensure timely responses to help the process along. By contributing, you become part of the process :blush:. Once you have submitted the contribution, the editors will decide how to add your contribution to the handbook. Take a look at the Editor’s guide to learn more about what criteria they consider.
Writing text
The book is created using Markdown - you can get familiarized with the basic syntax on the Markdown website. The getting started quick items are:
# Heading level 1
## Heading level 2
### Heading level 3

You simply write text as you are used to. To make something *italic*, **bold**, or ***bold and italic***.

> this is how you add quotes

- or lists
- that can go on
- and on
If you want to add code, use references, create links, or footnotes - it is all possible. We will expand examples here based on your needs, so if you need help, let us know by reporting an issue!
Adding relative links
Often, you will want to link to other pages or sections in the Research Support Handbook. Instead of going to the website, and pasting the link from there (for example, https://ubvu.github.io/open-handbook/contributing.html), you can add what is called “relative links.”
Relative links require three concepts:
- Working directory: The folder in which the file you are editing is located
./= indicates the current folder../= indicates the folder one level up
This Contributing guide is located in the “root” directory, and there is no upper folder. If we wanted to link to a topic, we would use ../topics/example-topic.qmd. This would create a relative link to the example file.
Relative links link to the .qmd files, never to the .html pages. These only exist when the pages are rendered!
If we were editing a topic, and we wanted to link out to a guide, we would need to use ../guides/example-guide.qmd. This because we would be in the topic folder for that file, and need to navigate one level up (../) and then down into the guides folder. For topic to topic references, we do the same (../topics/example-topic.qmd). This ensures that the links work also when a topic is embedded into a guide directly.
Section links
Whenever we link to a specific guide or topic, you can also link to a specific section. This helps you point readers to what you want them to read, and helps them find the information they need.
The easiest way to find these section links is to navigate to the relevant page, and click on the link icon next to the heading. This will cause your URL to change.
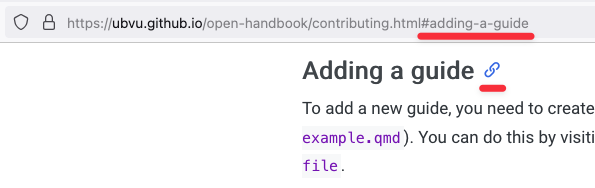
You add the #adding-a-guide (as applicable in your case) to the end of your relative link, and you will have created a relative section link! :blush:
If the section is on the same, you can drop the relative link altogether and keep only the part after the # (for example, #adding-a-guide).
Adding images
In markdown, you can easily add images and alt text at the same time. We require alt text on all images, and if you are contributing an image, you can best describe its value in the text.
You add images by using:
If you want the image to be hosted in the Research Support Handbook, use the following steps:
- Add the image you want to the
public/folder - Mark the exact filename
- Use
../public/<filename>as the URL for the image (for example../public/image.png)
More information about GitHub
We use GitHub to create this website automatically, and to manage all the incoming updates. You do not need to know how it works entirely, but we want to help you understand some things so you are not confused.
Repository
A repository on GitHub is like a folder on your computer. This can be many things, depending on what files it contains.
When we mention a repository here, we mean that we want you to look at a specific folder. The repository for this website for example can be found on GitHub directly. You will always be contributing to a repository, in order to contribute to the handbook.
Forking
A repository is owned by one or multiple people on GitHub. If you are not one of them, you can create a copy of the repository (folder) to make your edits in. This act of creating a copy is called “forking.”
When you create a copy, you do not have to worry about accidentally removing or destroying the handbook. Your changes are not reflected in the website until you submit a pull request.
Adding references
If you want to include references throughout the handbook, we recommend you do so in the following way.
Add the BibTex
You can find the relevant BibTeX information using a tool like the DOI to BibTeX converter. Counterintuitively, it also works on ISBNs for example.
After you found the BibTeX information, you add it to the references.bib file (preferably all the way at the bottom). Example BibTeX information is:
@ARTICLE{example-code,
  title     = "Example Title",
  author    = "Author, Example"
  journal   = "Example Journal",
  year      =  2042,
  copyright = "https://creativecommons.org/licenses/by/4.0",
  language  = "en"
}
Add the citation
To add the citation to a page, you use [@example-code] or @example-code.
@example-code will result in an in-text citation, like “Author (2042).”
[@example-code] will result in a regular citation such as “(Author, 2042)”.
For more details on citations, see also the Quarto help page on citations.
Rendering handbook locally
Sometimes you may want to preview the changes you are making to the handbook. That is possible in most cases, but requires you to install some software. You need to install Quarto and assuming a successful installation, you then need to run the following code in your terminal1:
# Clone the git repository
git clone https://github.com/ubvu/open-handbook
# Go into the right folder
cd  open-handbook
# Render the handbook
quarto render .
This will create a file called _site/index.html. You can now open the rendered website in your browser by running:
# For Windows machines, use
start <browser-name> _site/index.html
# For Mac machines, use
open _site/index.html
# For Linux, it could depend on the exact Linux operating system, but you could try first
xdg-open _site/index.html
Note that you should not copy the < and >, they are written here to indicate where the browser name should come.
You can also make changes locally and push them to the github repo to open a new branch. The procedure for this in your terminal is as follows:
# Navigate to the folder where the file you want to edit is located
cd <foldername>
# Open the file to edit
nano <filename>
# Edit the file and save by using `Control + O`. Exit nano by `Control + X`
# Add the file to the staging area
git add <filename>
# Commit the edits
git commit -m "<commit message>"
Once you are done editing, you can also render the page to check that all is well. If you have already used quarto render . once, you can simply re-render the page you were working on, using quarto render <path/filename.qmd>, e.g. quarto render . /tools/yoda/index.qmd, which is a lot quicker. Note that you should not copy the < and >, they are used here to indicate where to add file and folder names, or a suitable commit message.
Once you are happy with the result, you can push the new version back to the github repository online:
# Push the edits to the remote (online) repository. You can only push to a new branch: the main branch is protected.
# If you do not have editing rights to the handbook repository, you would be pushing to your fork.
git push origin main:<new-branch-name>
# You may have to authenticate using your SSH key.
Note that you should not copy the < and >, they are written here to indicate where file and folder names should be written. After doing this, your new branch is opened in the repository on GitHub and you can create a pull request.
This procedure requires some background knowledge on working (with git) in the command line. The resources below give more explanation:
- Navigating Files and Directories and Create a text file from the Carpentries’ Unix Shell lesson.
- Collaborating and Push local branches to a remote from the Carpentries’ Version Control with Git lesson.
We do not guarantee this will work immediately, but should cover most instances. If you are looking to contribute and want to render things locally, try this first, and if you run into any issues, let us know in an issue report. We’re happy to try our best if you share your error messages 😊
Using VS Code to contribute
If you are planning to make multiple contributions to the Handbook, working in the GitHub web interface can get cumbersome. In that case we suggest you use an IDE (Integrated Development Environment) to create and edit pages. An IDE is a text editor that has lots of extra functionalities for developers, such as integration with Git. VS Code is a widely used, free, IDE and it is very well suited to edit Markdown files and has integrated Git & GitHub support. This allows you to work on your edits on your laptop whenever you want, preview them using the Quarto client and Push your changes to GitHub. No special knowledge of the Git Commandline is necessary.
Install VS Code
VS Code is available for Windows, Mac and Linux. Install it from https://code.visualstudio.com/Download.
Note that VS Code is a Microsoft product, but the source code of VS Code is open source. The VS Code version you download from the above link is not, and it contains telemetry/tracking. A completely open source version without telemetry is available from https://vscodium.com, the functionality is the same.
Install the Quarto extension for VS Code
Install the Quarto Extension to make sure VS Code understands the Quarto format.
Note that unfortunately the Preview functionality does not work very well with a project as large as the Handbook.
Make sure Git is installed
- Open VS Code and click on the Git icon on the left. If you do not have Git installed you can do so from here, the download button will lead you to https://git-scm.com/downloads, you do not need the GUI client.
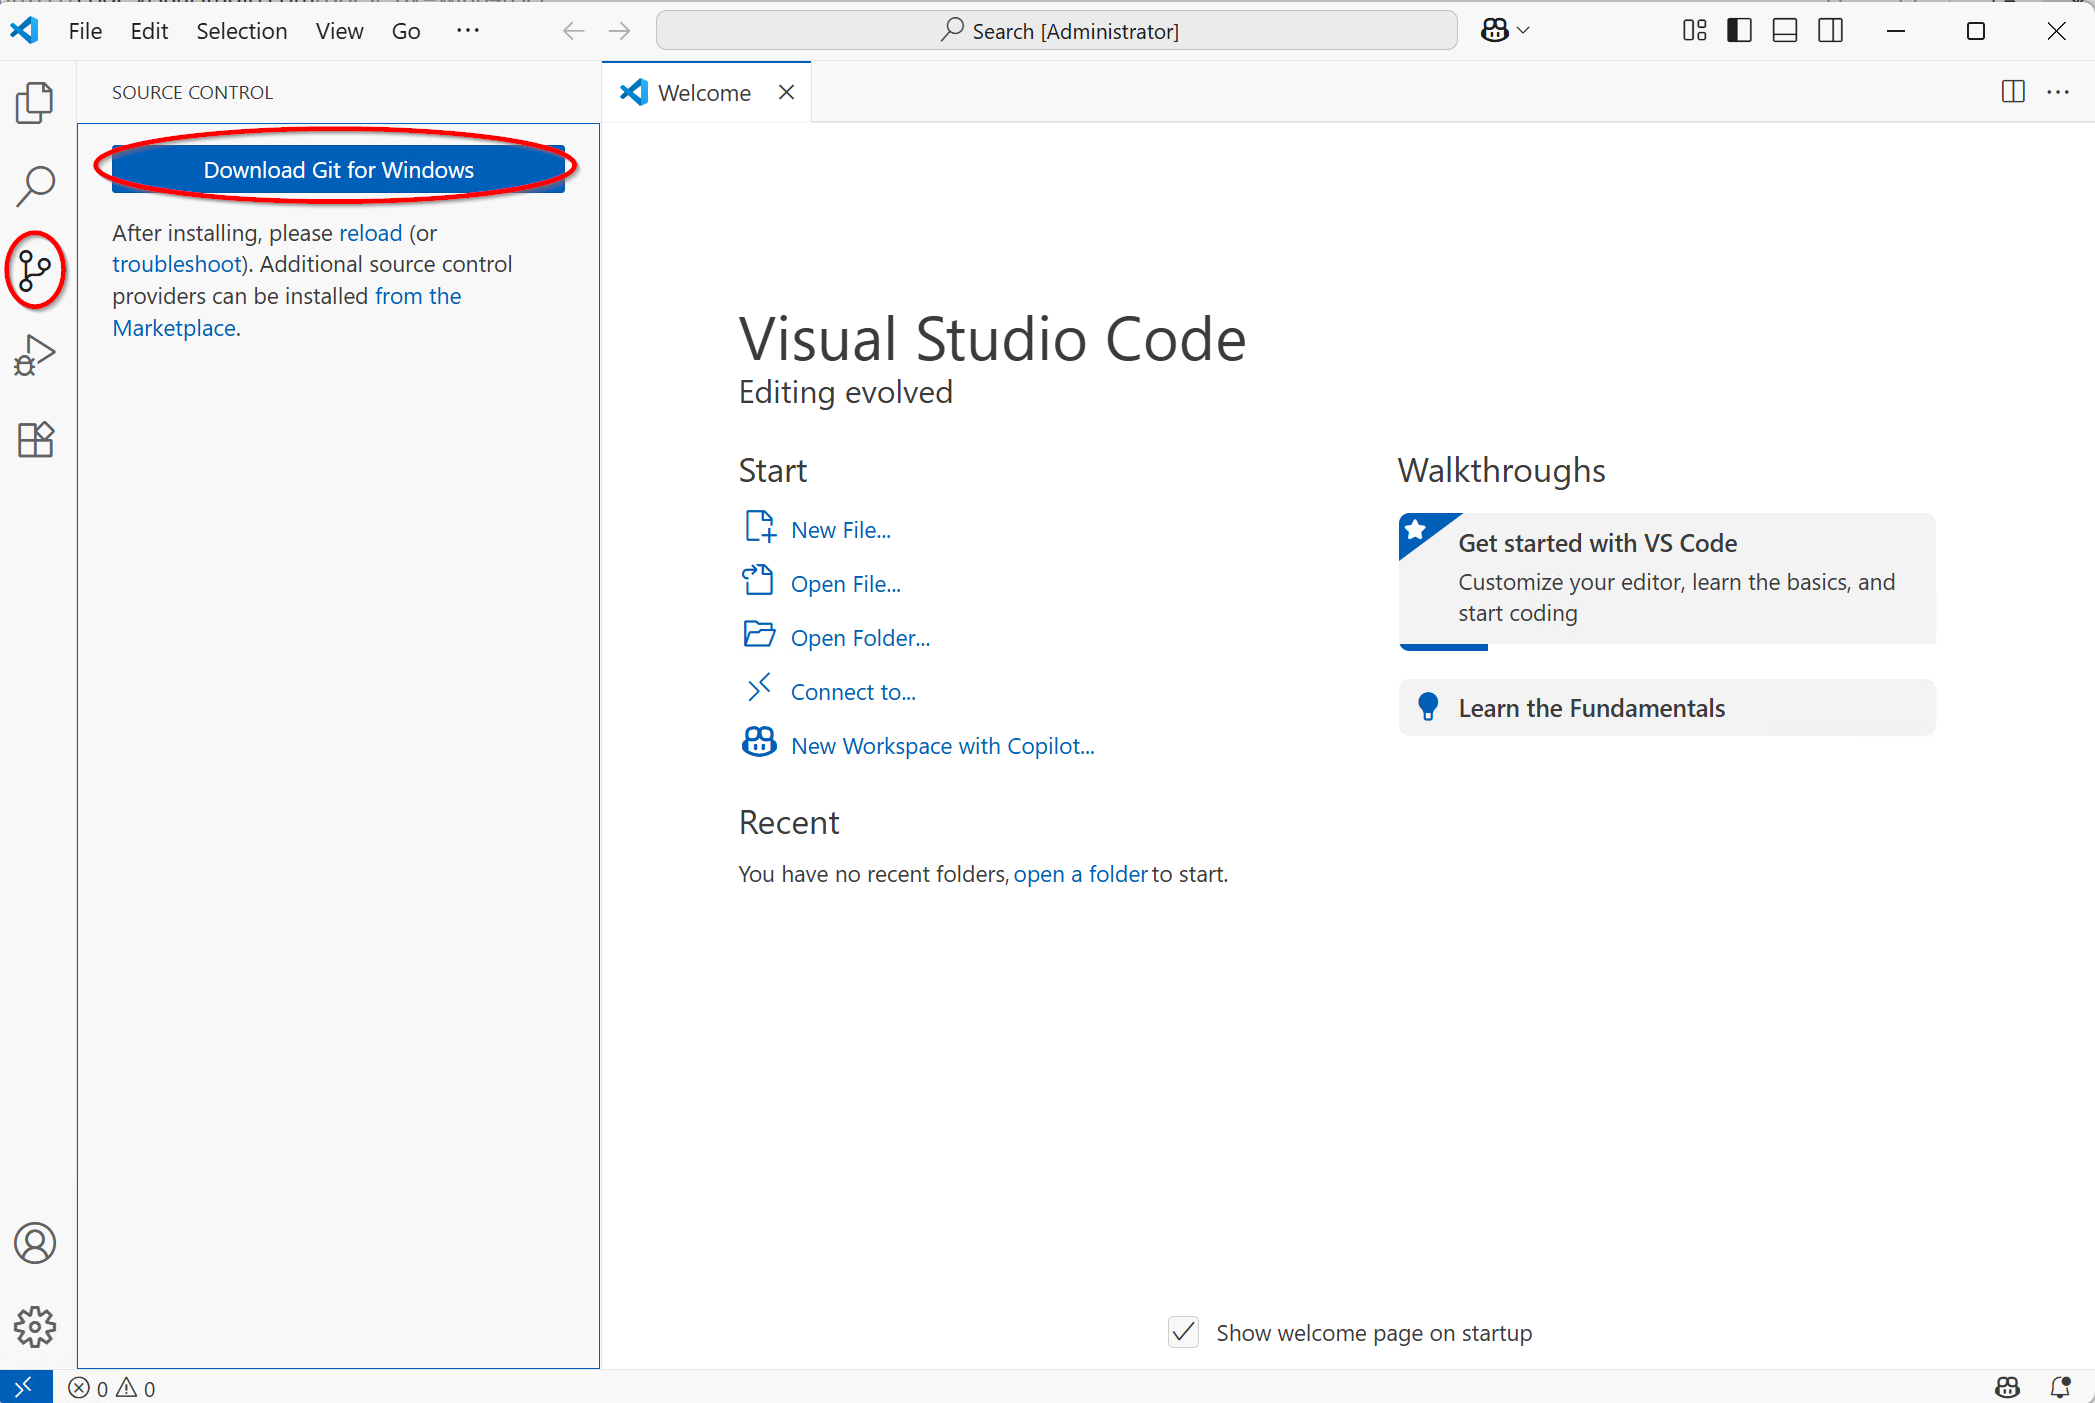
 - During the install you can set VS Code as default editor
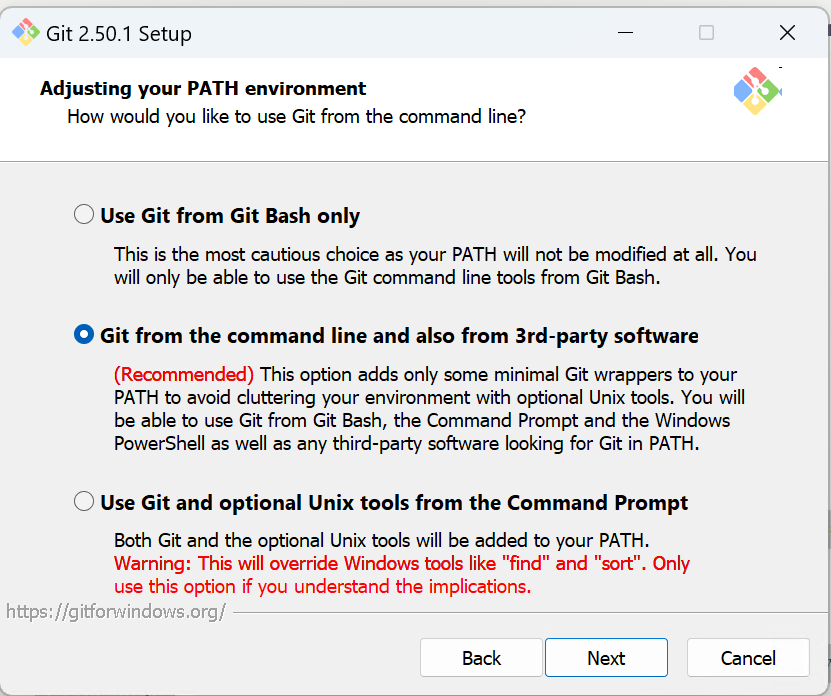
Keep defaults for the rest.
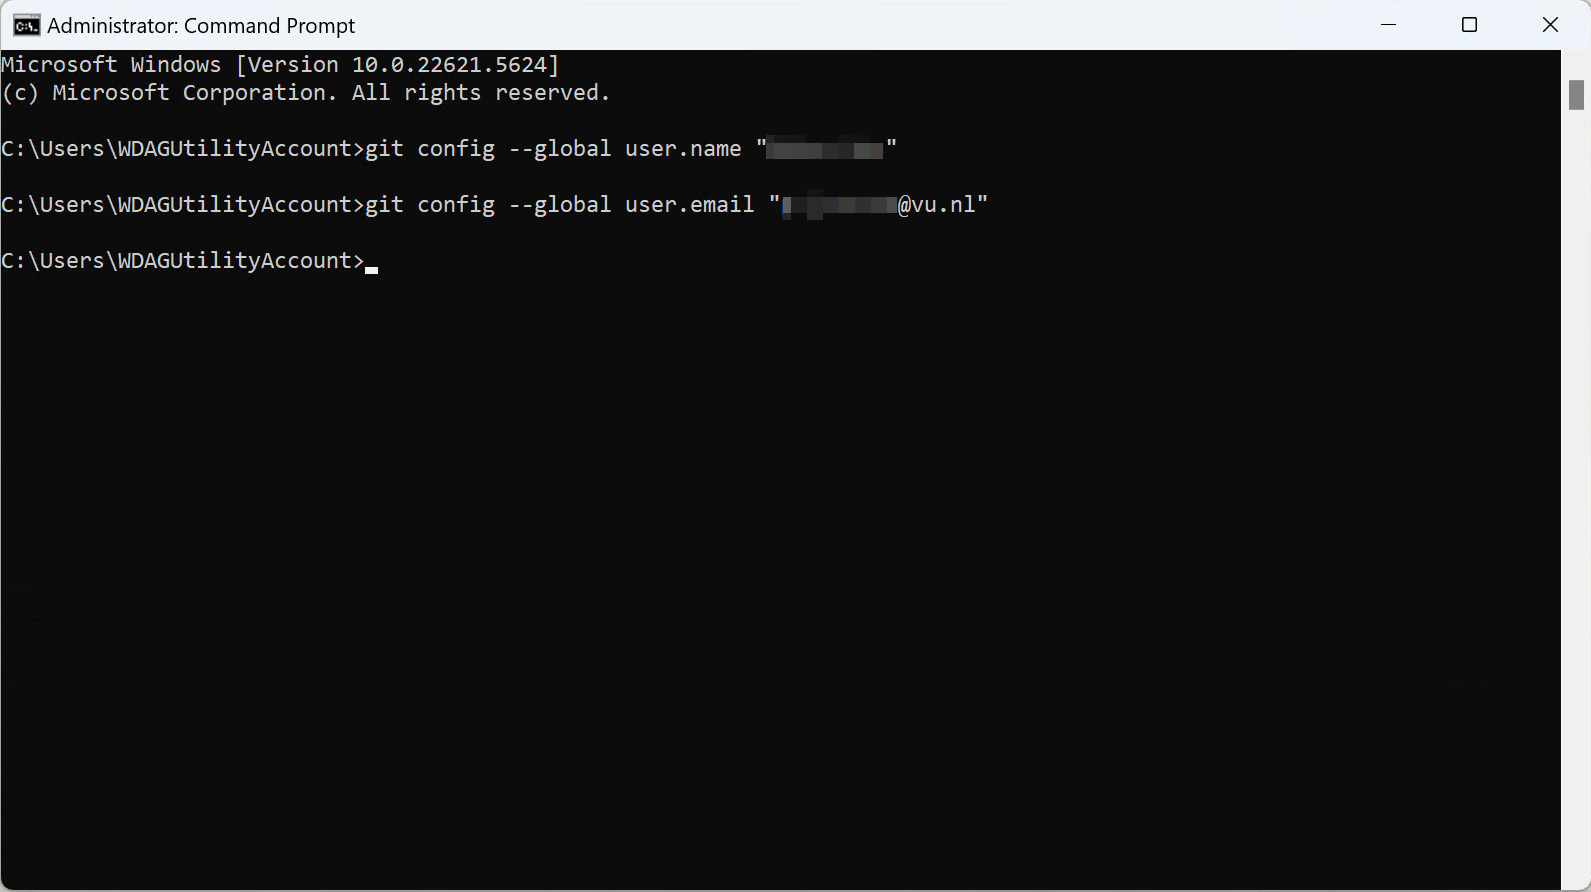
Open a command prompt to set your username and email address, without this you cannot push your changes to GitHub.
Create a root folder
Create a folder where your handbook copy and other code projects will be stored. For example on Windows C:\users\<username>\VS Code.
Note that it is not advisable to store code projects in a folder which is synced with OneDrive (such as the “Documents’ folder), OneDrive will have problems syncing the many small files that git uses. The same applies to SURFdrive and Research Drive. You will push changes to your code projects to github so there is no need to make extra backups.
Create a Fork of the Handbook
- Go to the Handbook repository on GitHub.
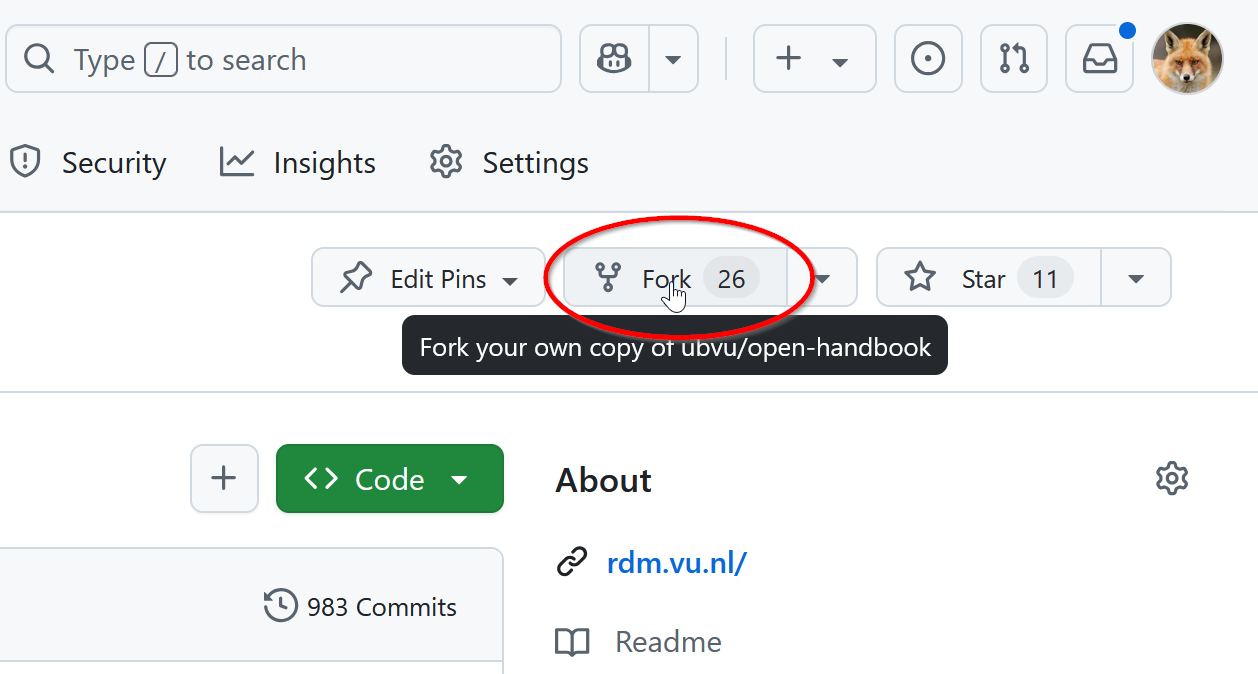 - Click Fork button at the top right.
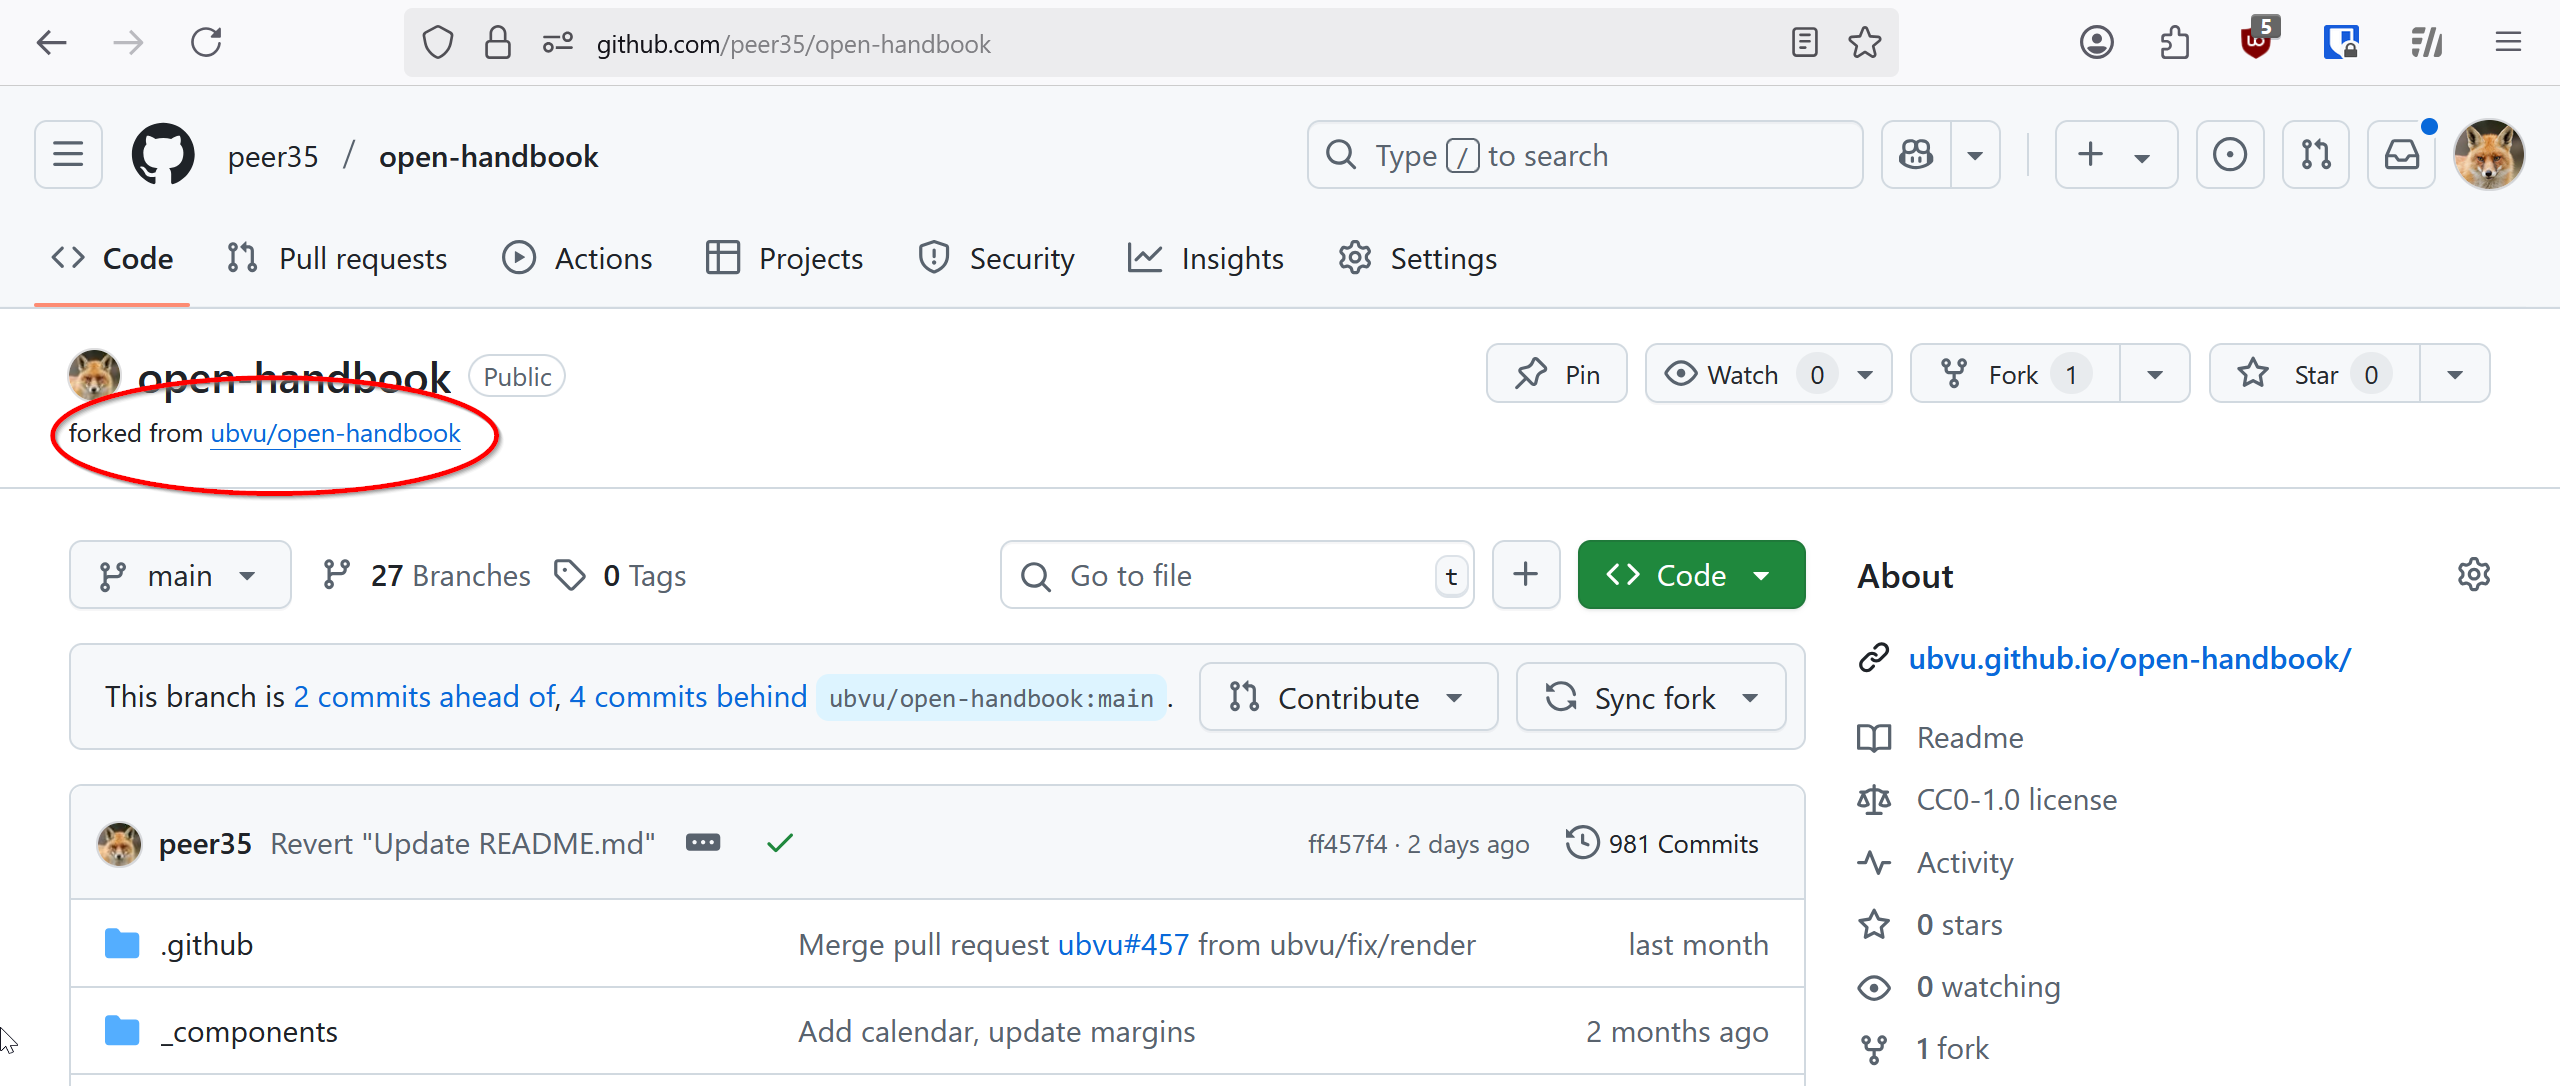 - You end up with all the code in your personal account.
Clone your Fork
- Go to the Git Tab (or click File > New window), there you will see the option to “Clone Repository”.
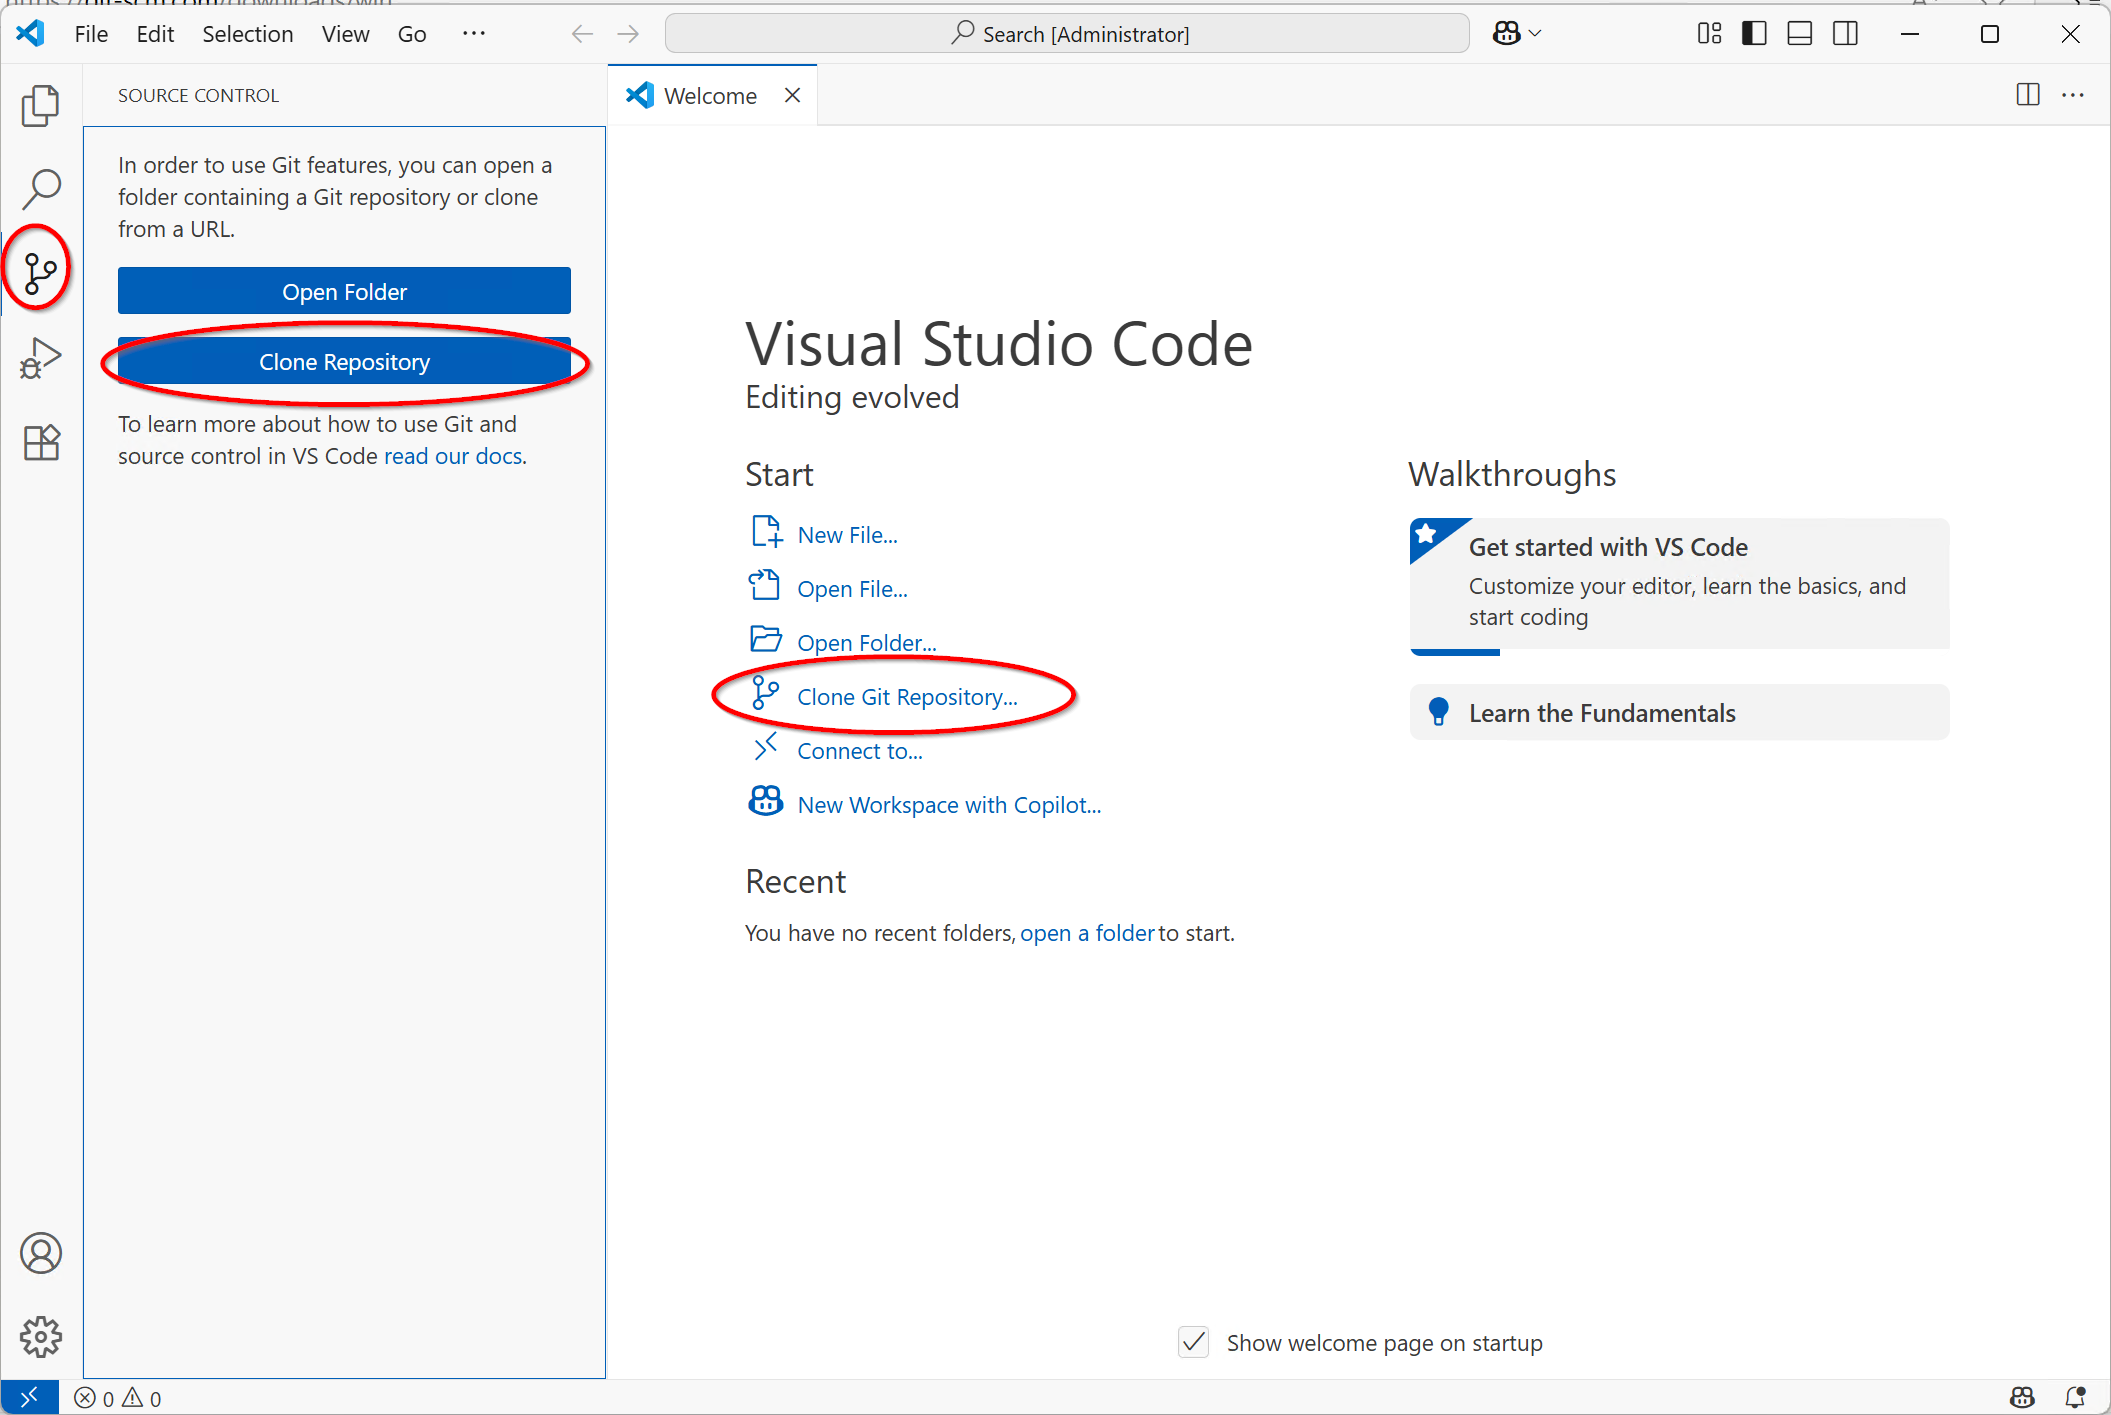
 - You see the option “Clone from GitHub”.
Sign in to GitHub
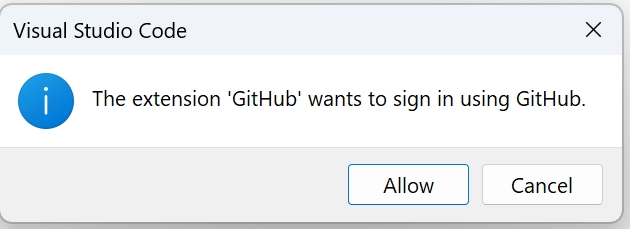
If you have never signed in with Git before you will be asked to do so. Click Allow.
The GitHub Sign In page will be opened in the Browser. Login as usual.
Select the Fork you created earlier
- Once you are signed in you can select from a list of repositories.
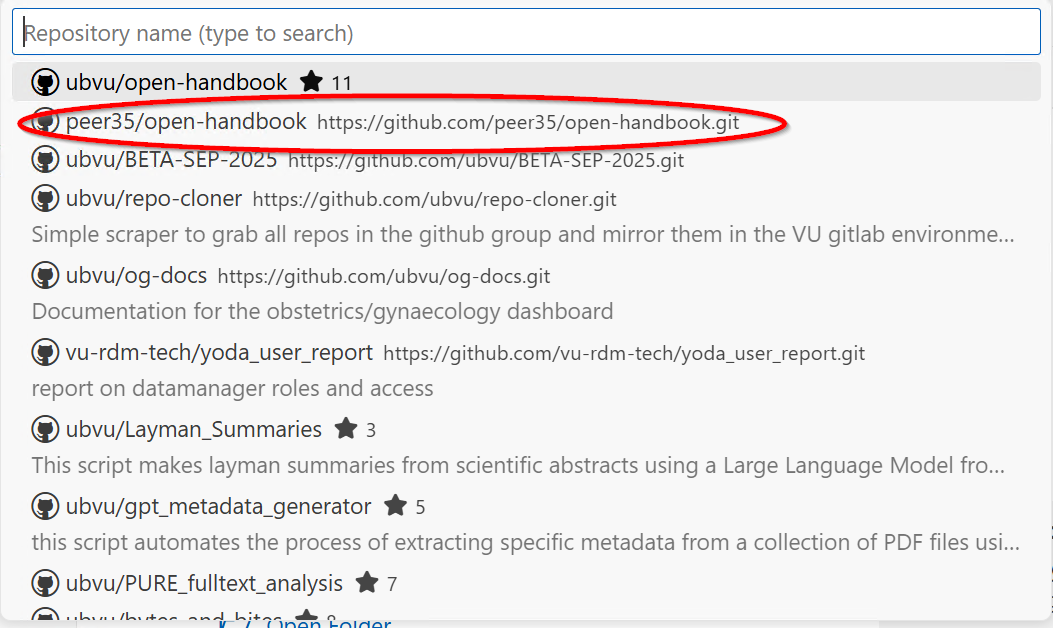 - Select the Fork you created earlier.
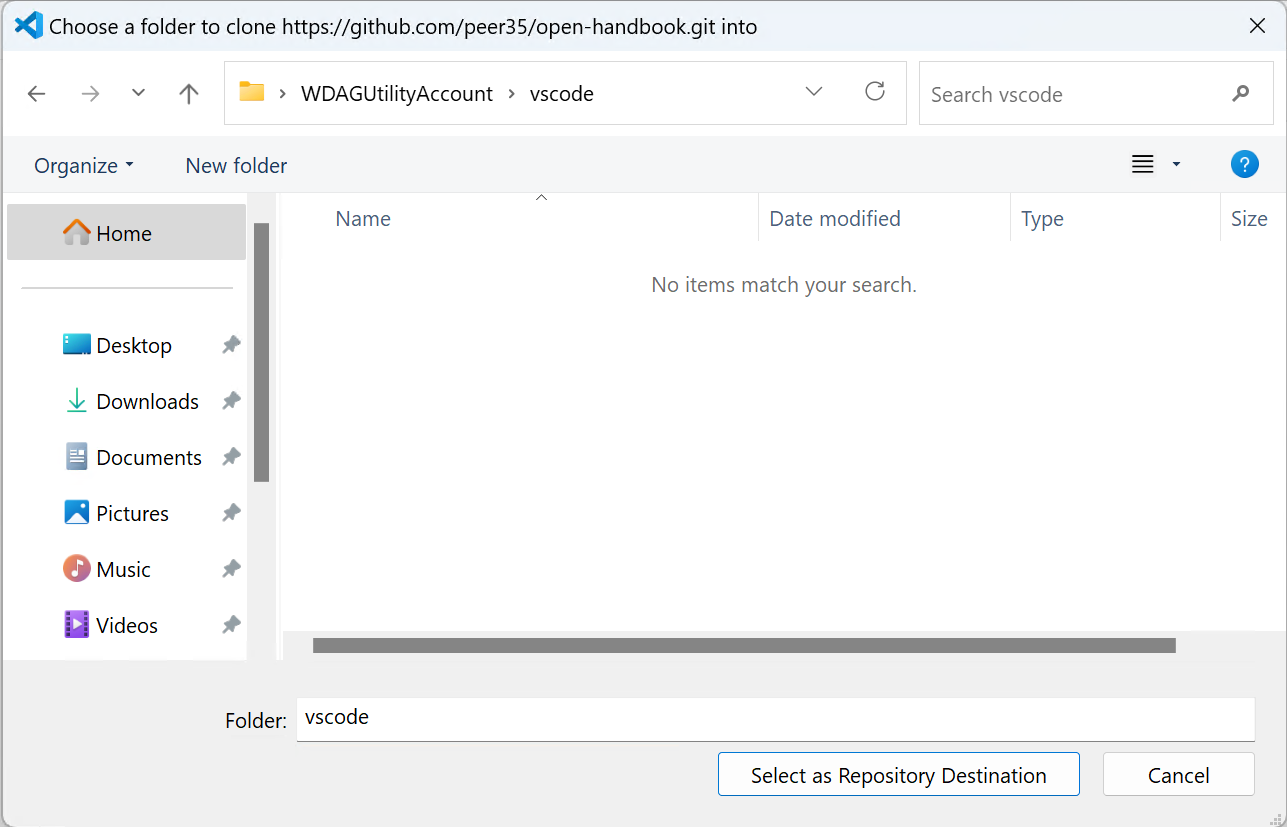 - Select your code root folder.
- A folder called
open-handbookwill be created in that folder and you can open it in VS Code.
Editing
Now you have a full copy of the Handbook on your laptop. Of course you are not working on the Handbook directly, but on your Fork.
You can make changes to the actual Handbook by making changes to your Fork and creating a Pull Request. The Pull Request will be opened in the ubvu open-handbook repository. The editors can then approve your request, perhaps after suggesting some changes, and your changes will be merged to rdm.vu.nl.
The handbook is a collaborative effort, multiple people will be making changes to multiple files at the same time. To prevent 2 or more contributors making changes to the same file you should keep the number of files you change in your Pull requests small, preferrably just one page at a time. The best way to do this is to start by creating a branch for the changes you want to make.
Create a branch

 - Provide a name for the branch. Keep it short and descriptive, this is mainly for yourself so you can easily remember what you created the branch for.
VS Code will automatically switch to the branch. You can always see the branch you are working on in the bottom left of the Window.
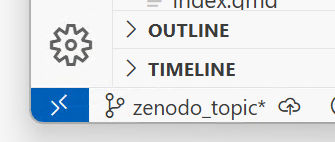
You can click on the name there to switch the branch you are working on.
Remember your changes are tied to the branch. If you would switch from the zenodo_topic branch to the main branch you will no longer see the changes you made to the Zenodo topic page. But if you have committed your changes they will be visible again once you switch back.
Editing the page
VS Code is basically just a text editor. Open the file you want to work on by double clicking or right click to create a new one in the “Explorer”.
The Quarto Extension includes a Visual Editor with which you can format Quarto pages without typing Markdown code.
- Work on your page and save your changes (Click File > Save or use
CTRL+S).
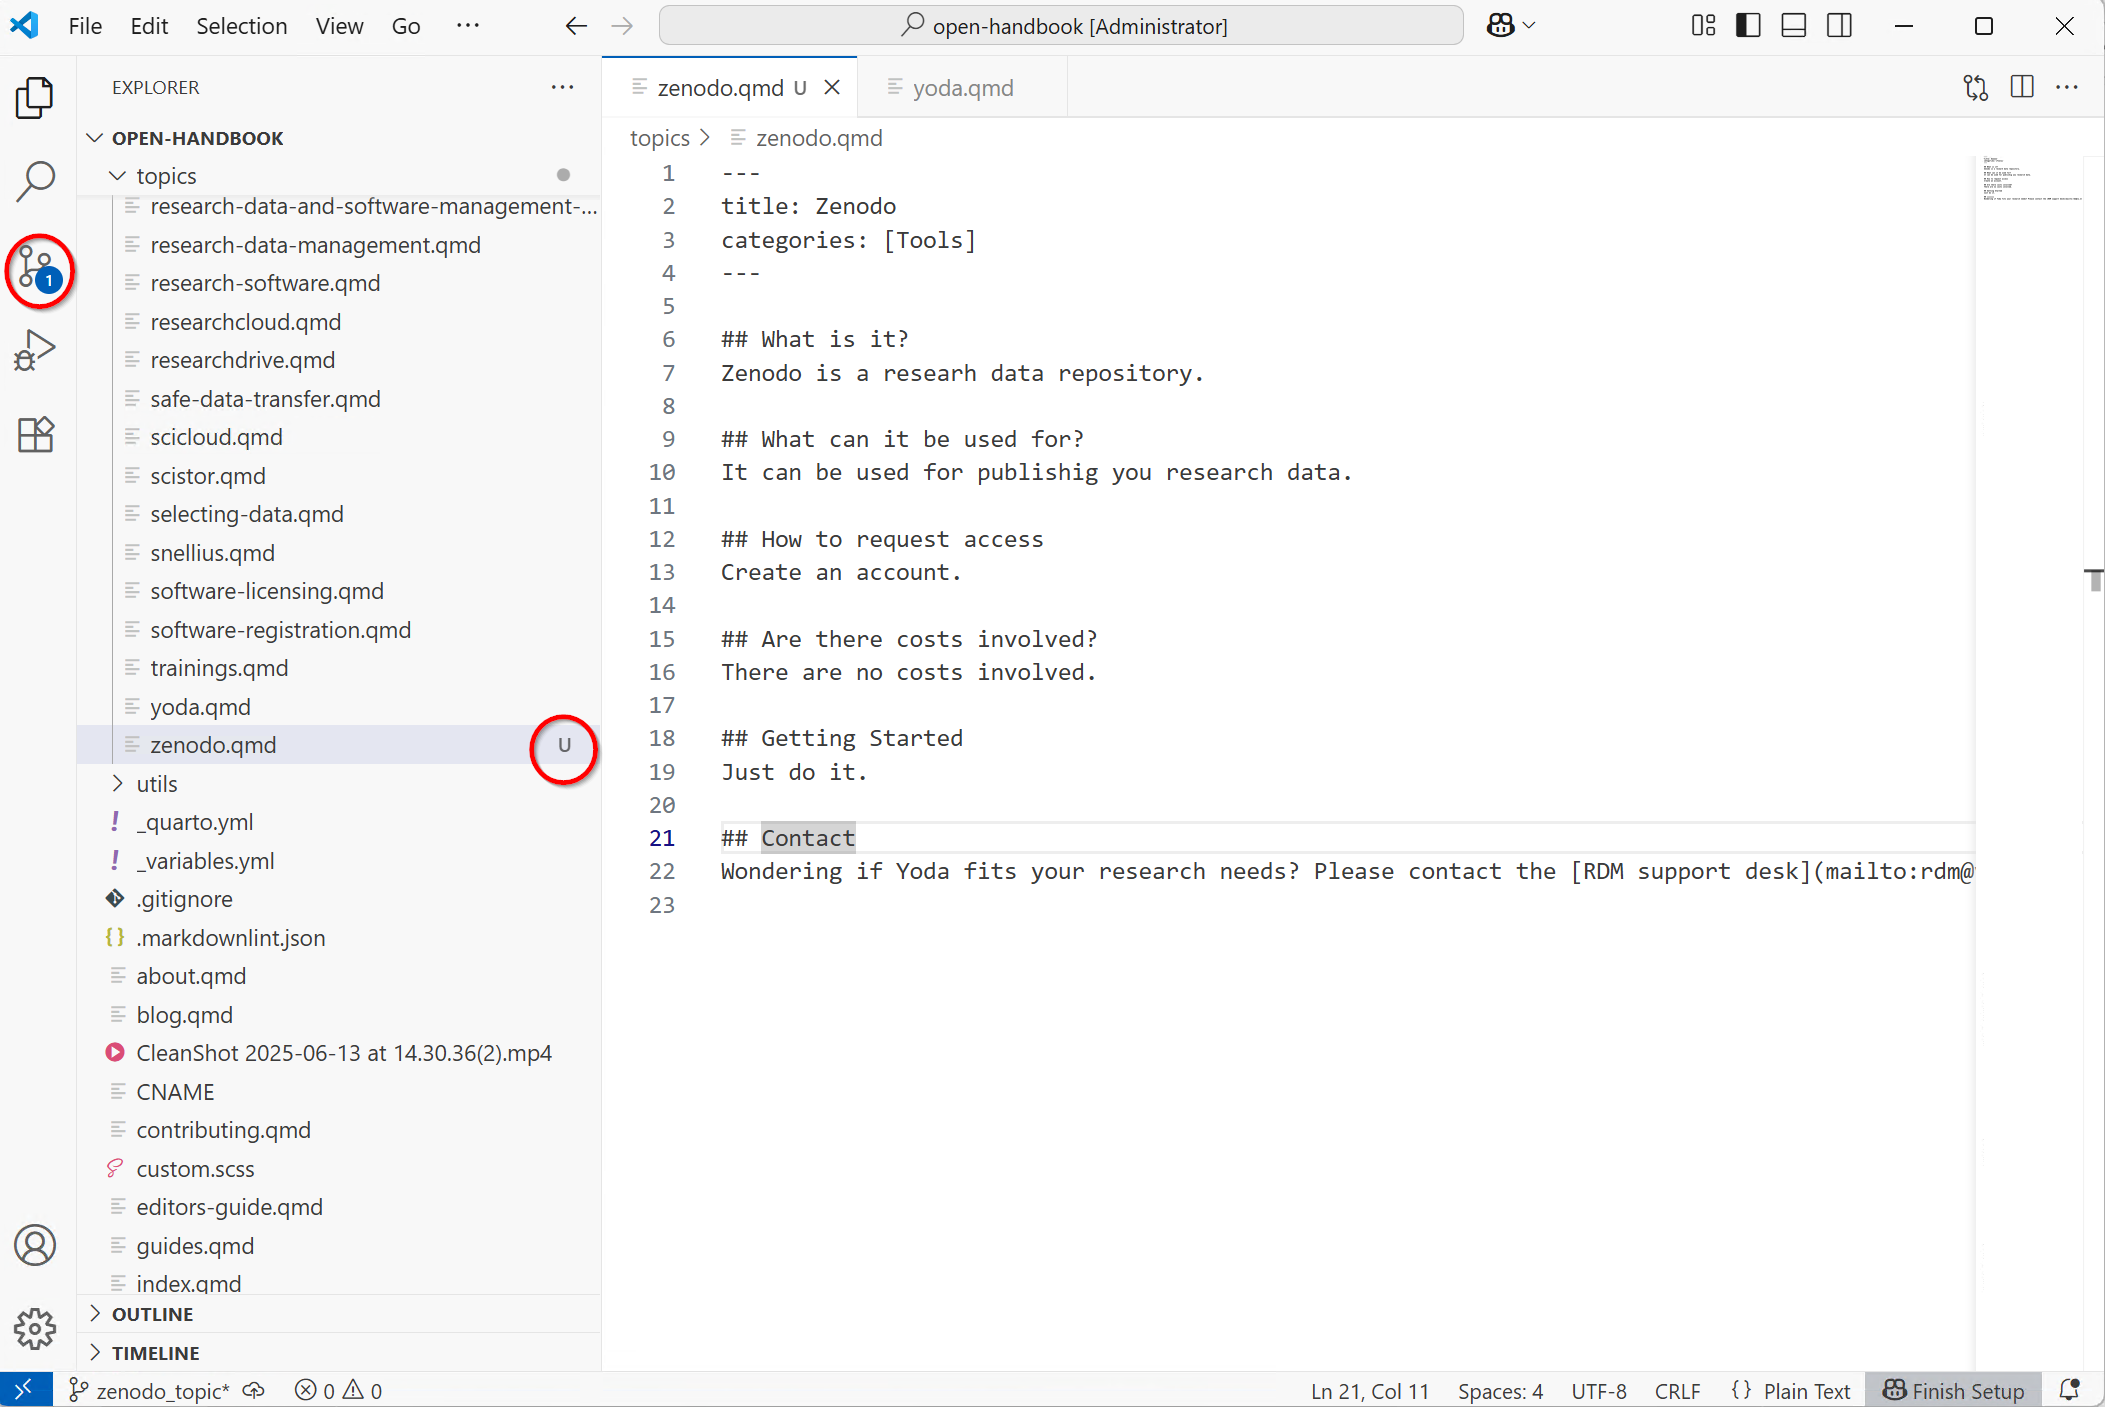
- VS Code will show you the changes with respect to the branch. Now you can commit
Commit changes
- Click on the Git icon on the left.
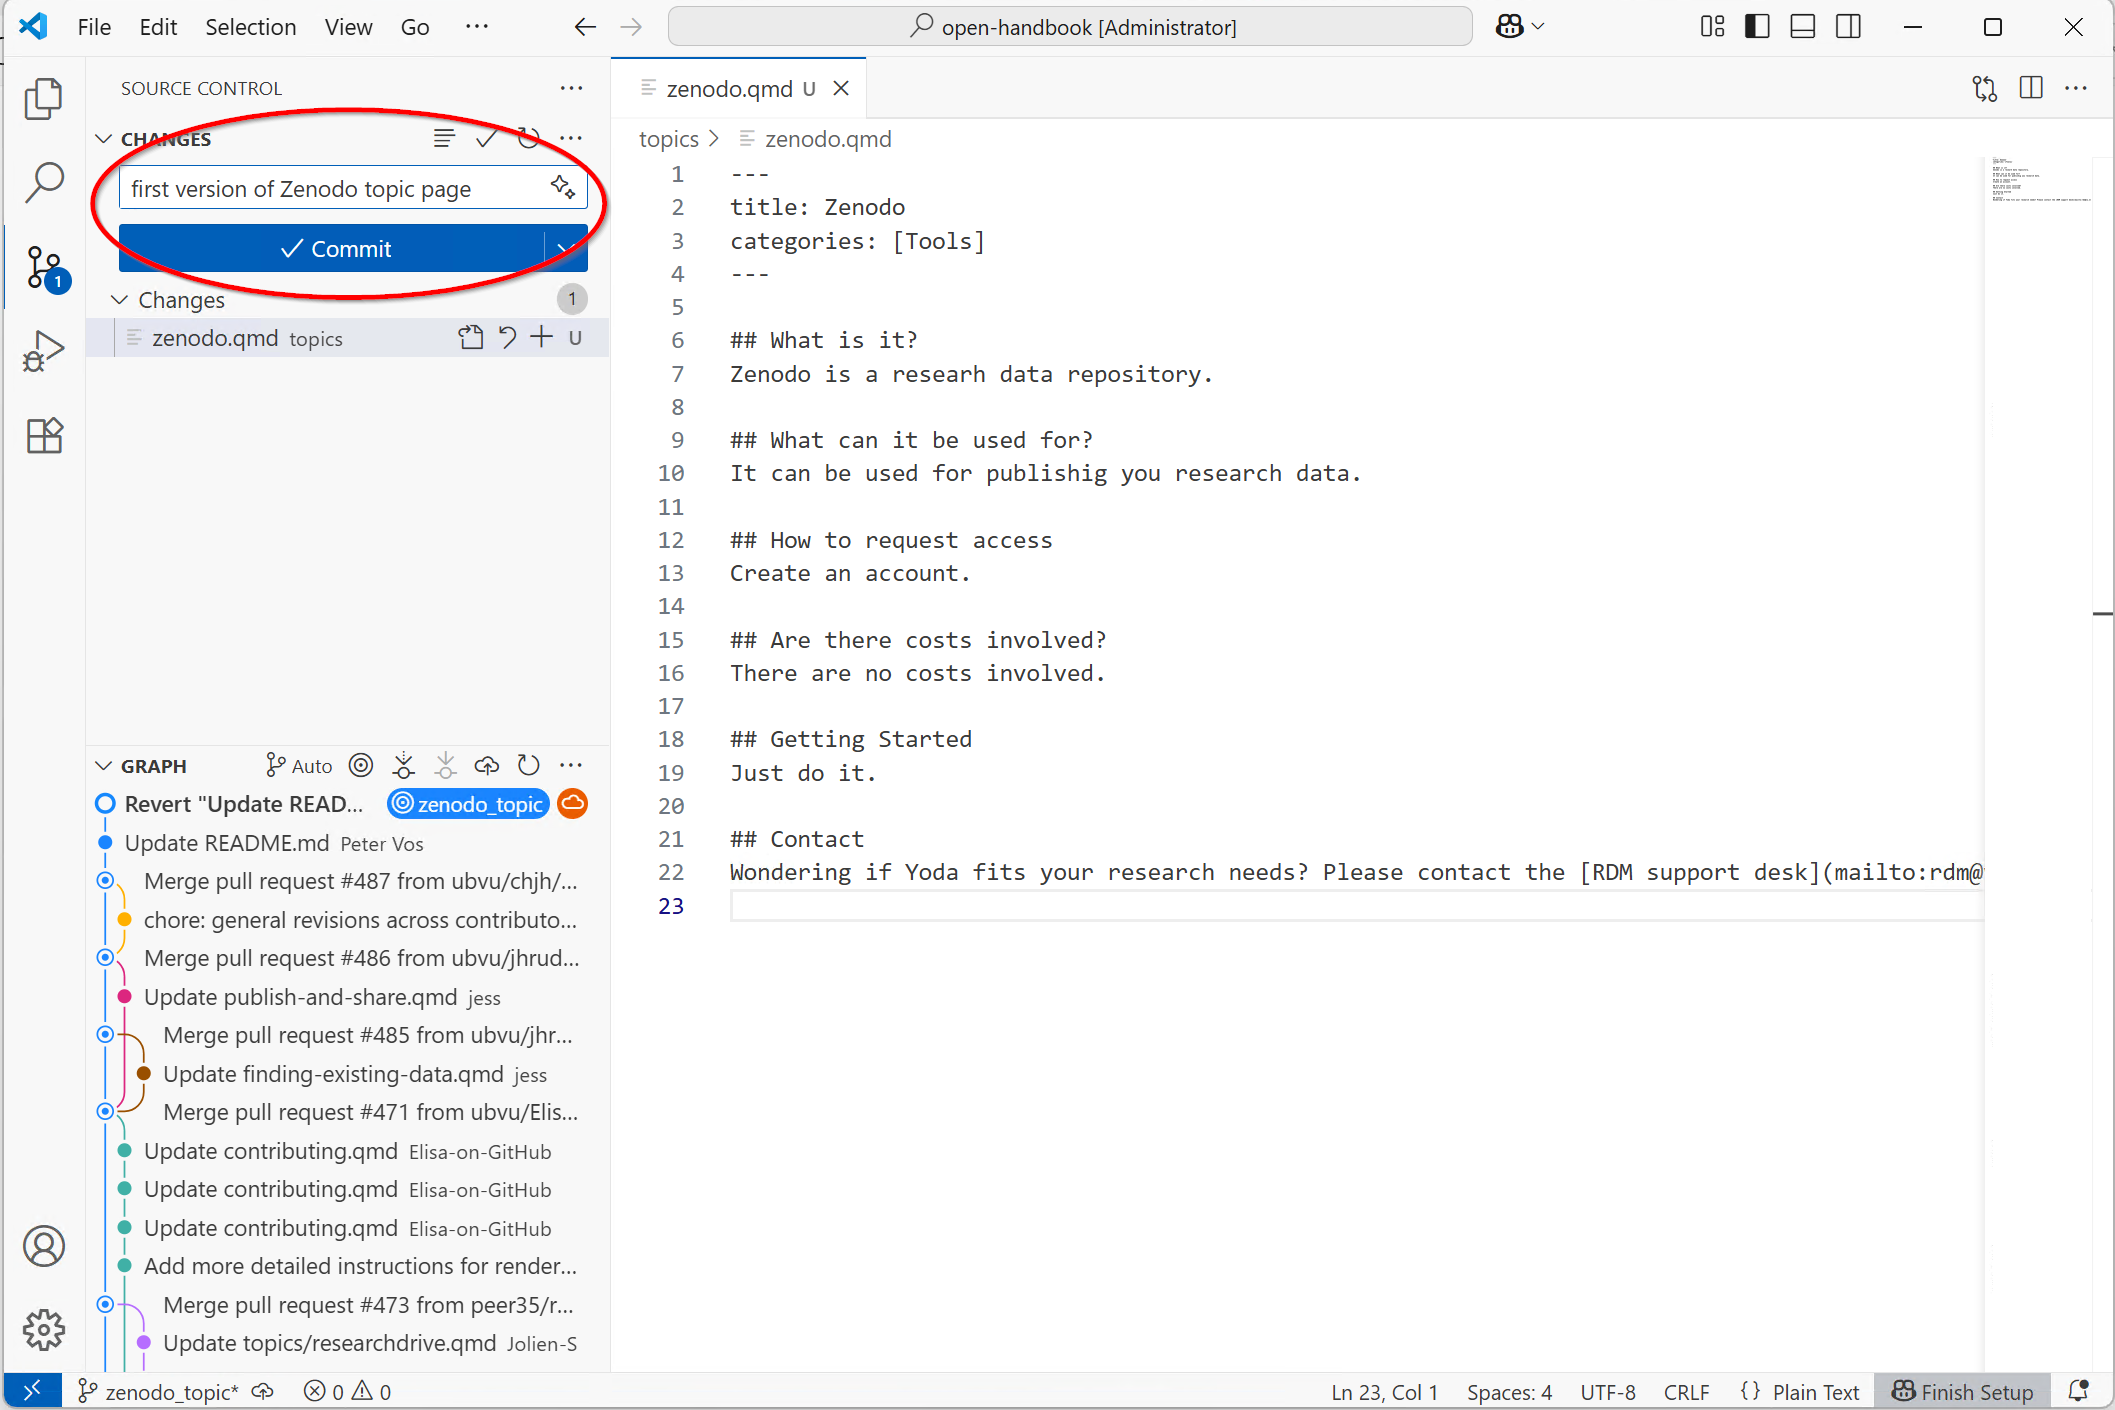 - Set a short descriptive commit message, click the plus sign next to the files you want in your commit, and click commit.
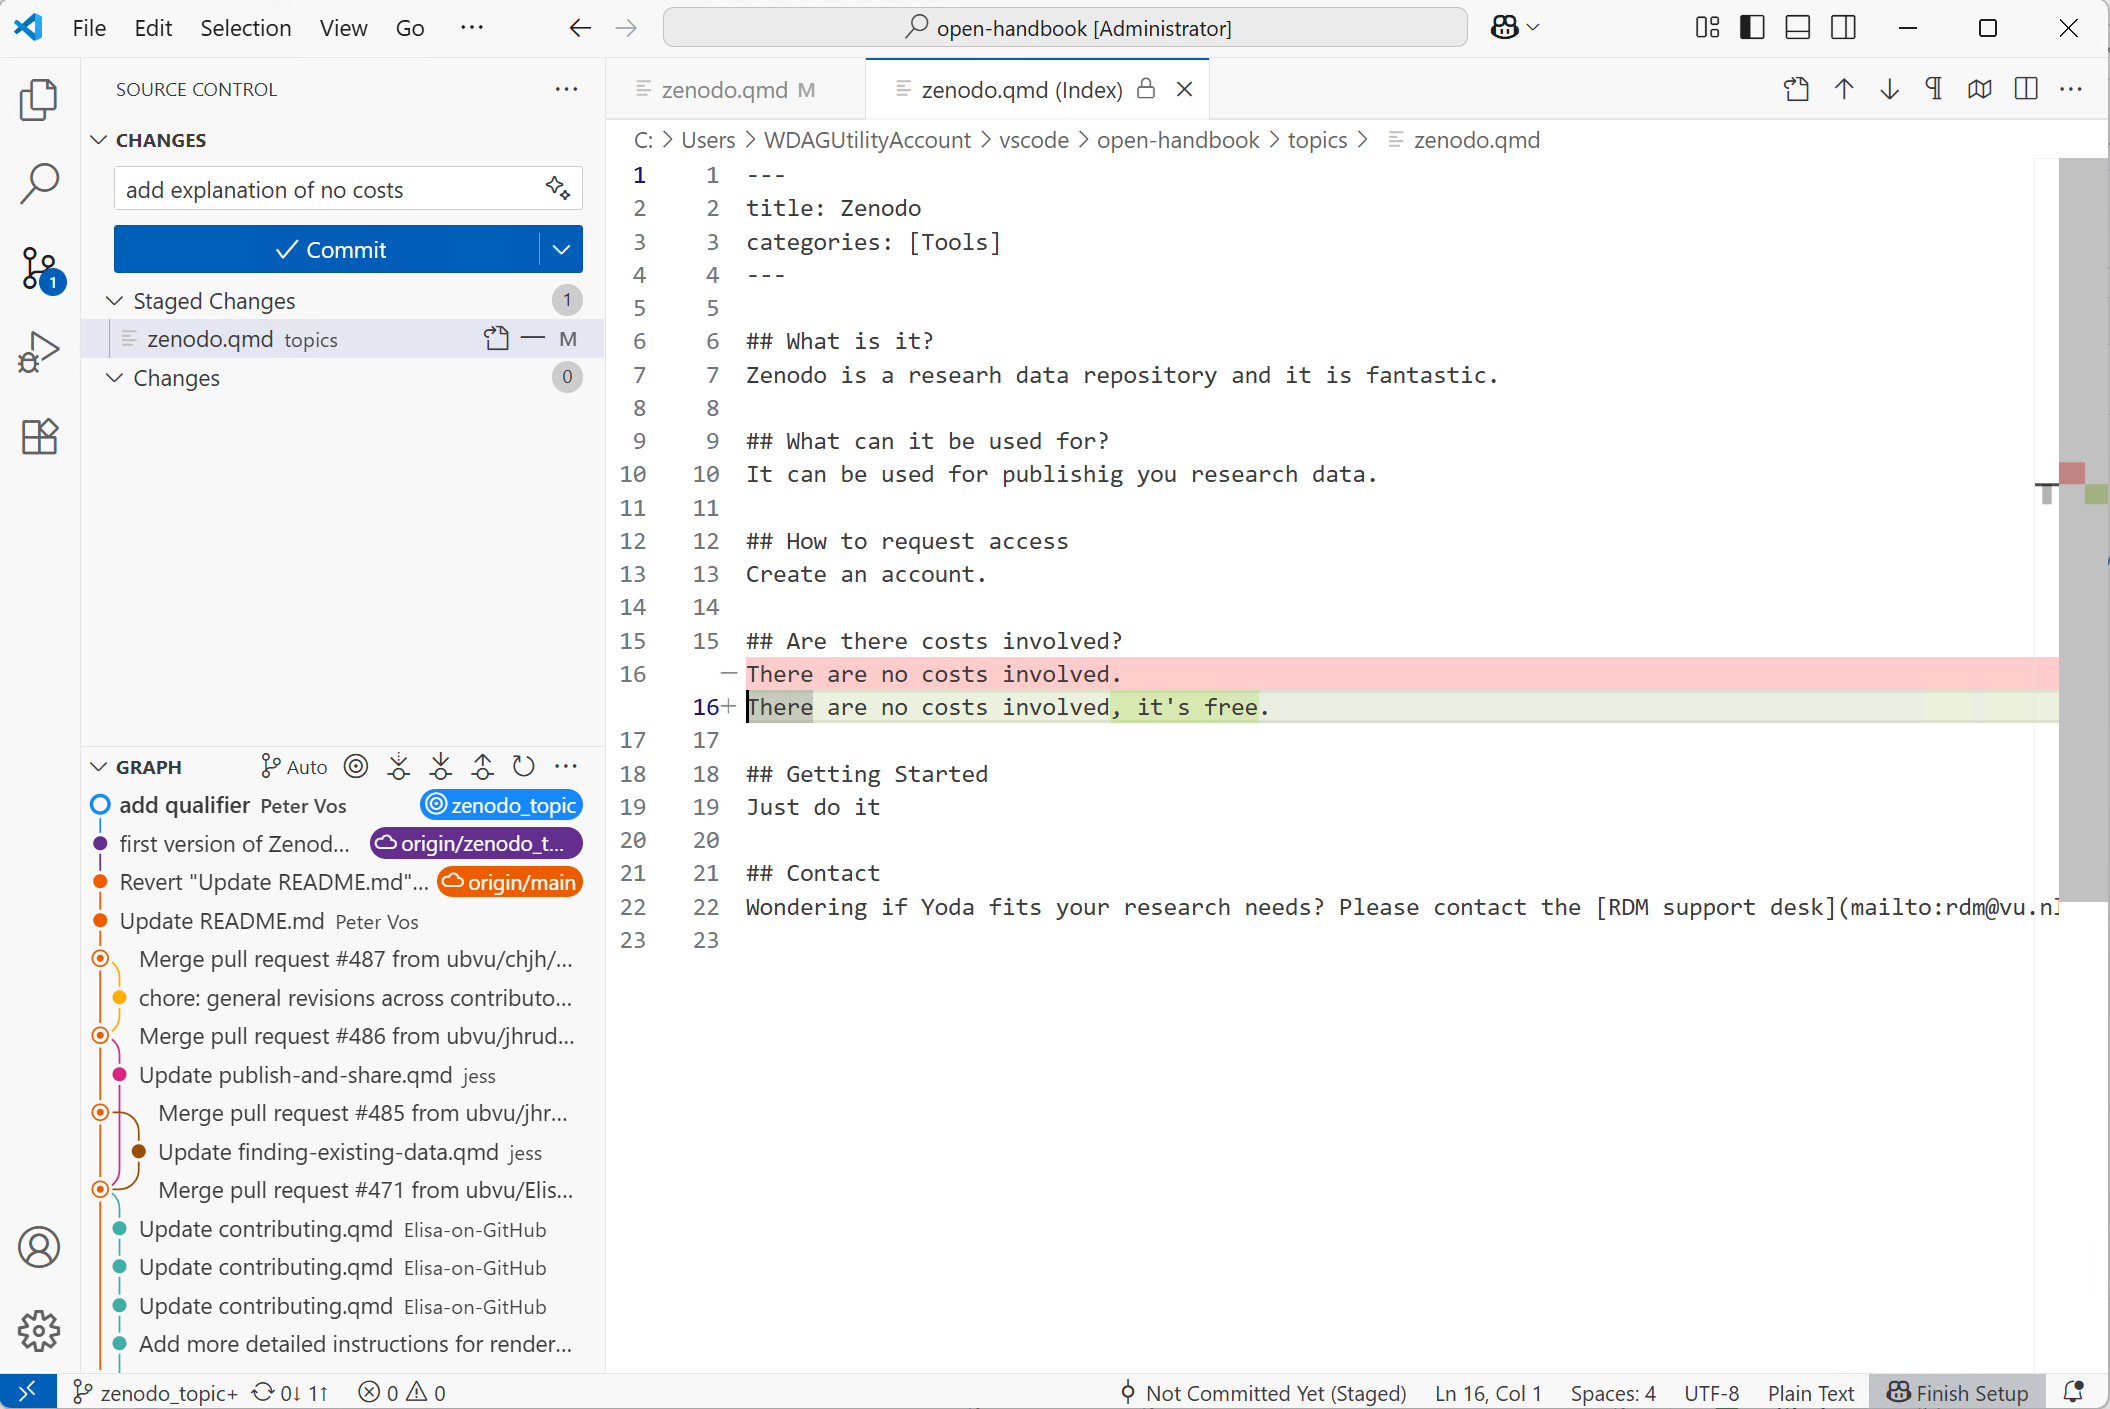 By double-clicking on a Modified file you will see a visual representation of your changes.
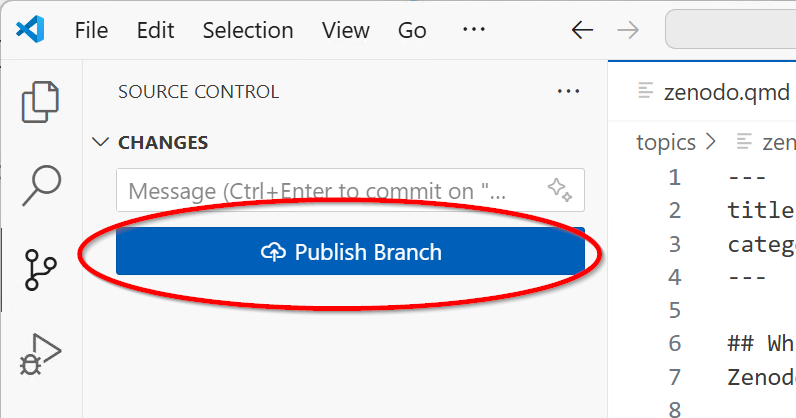
Publish Branch
Now you have committed your changes to the local git repository on your laptop. You will also need to publish the branch to github, so it gets updated as well.
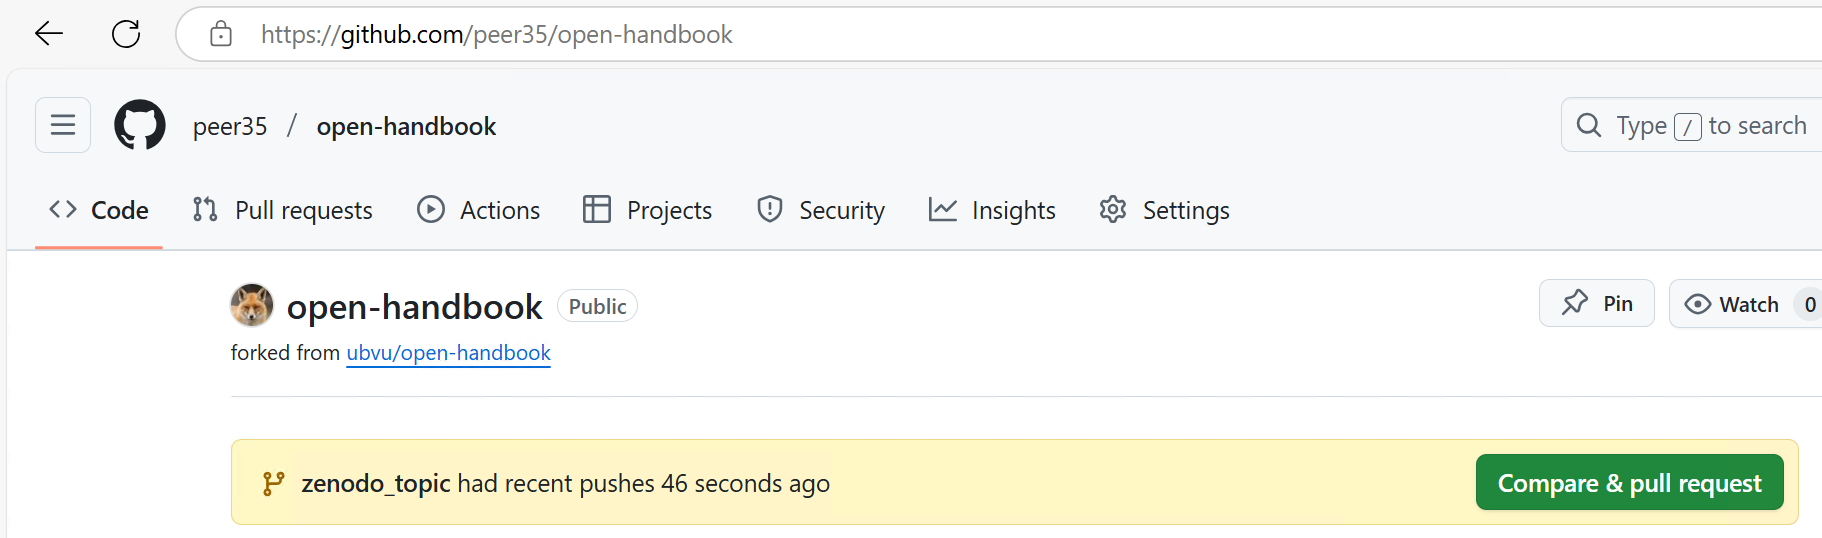 You will be able to view the branch on github.
VS Code will now allow you to Sync (Push and Pull) your commits to the branch on GitHub.
Create a Pull request
Once you are happy with the changes you made you can submit a Pull request on GitHub.
More information
The VS Code documentation has a nice introduction to Git section with more useful tips.
The Quarto tutorial has more tips on using VS Code to edit Quarto pages.
Using the Visual editor

- To use the visual editor right-click anywhere in the document you are working on, or use
CTRL+SHIFT+F4
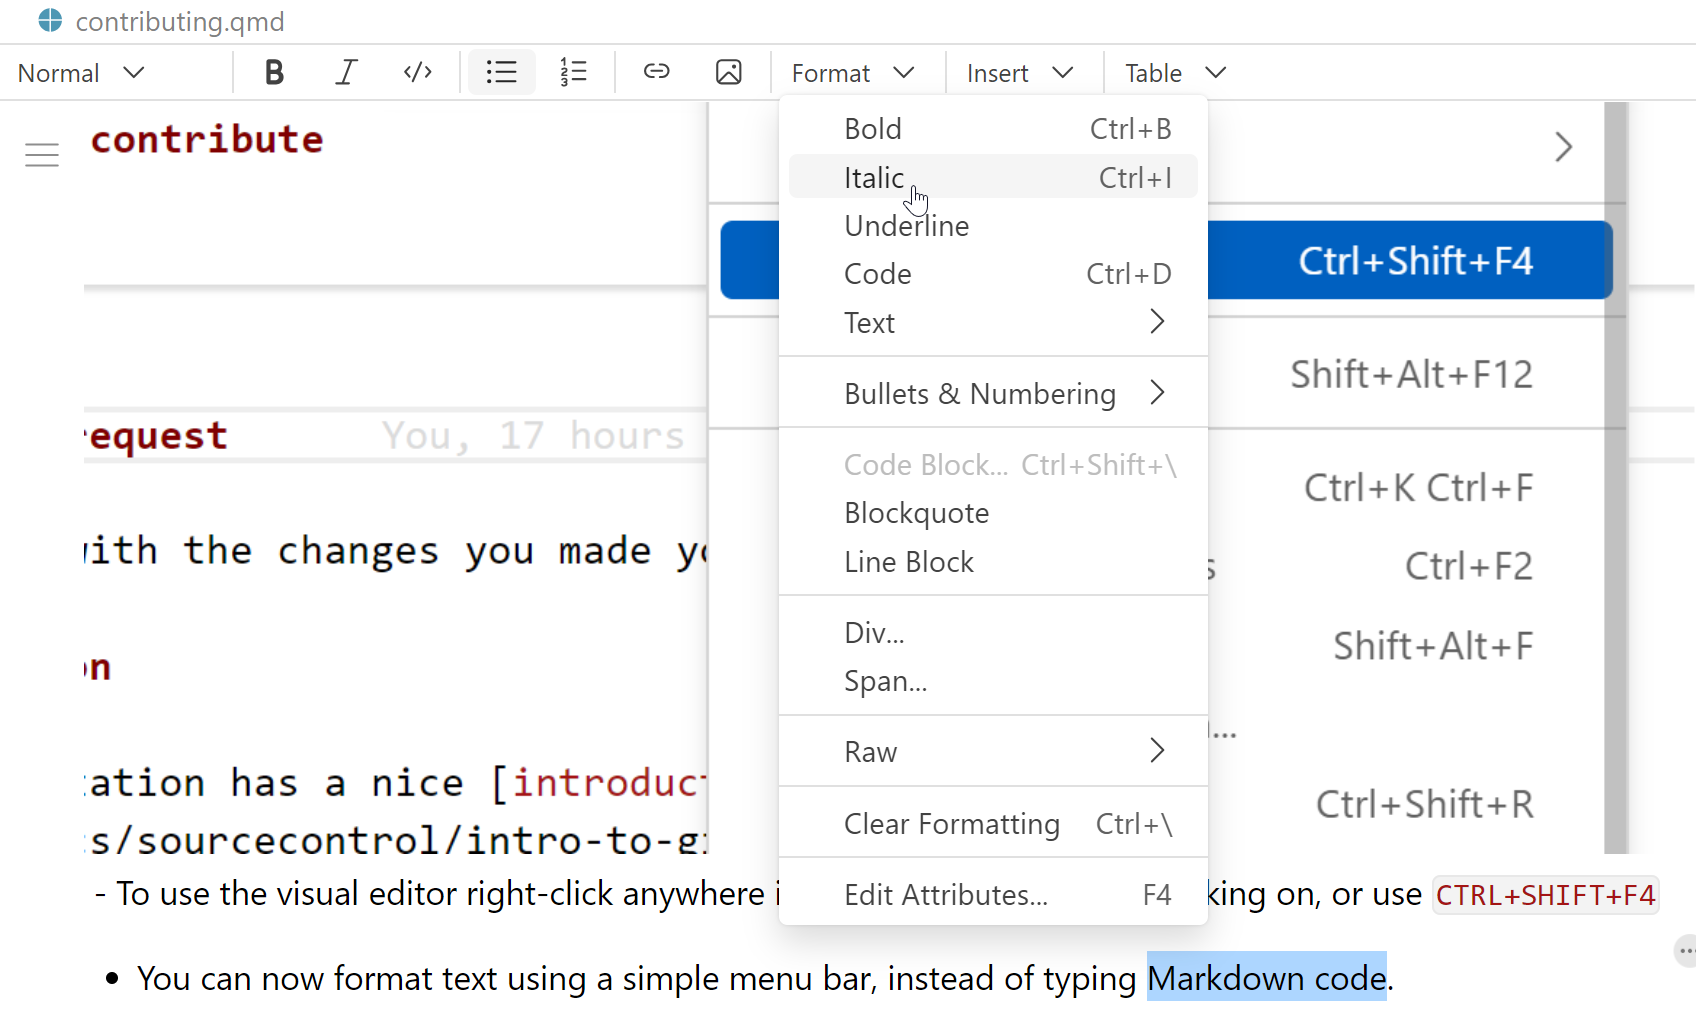
- You can now format text using a simple menu bar, instead of typing Markdown code.
Footnotes
For Linux and Mac, this is usually called the terminal. For Windows machines, you would have to use the Git Bash↩︎